Saturday, December 26, 2015

Thank you cards

This is the time to send thank you cards.  Have you noticed that fewer people send them these days.  I blame the ease of social media.  All the technology makes it easy to send a quick message that gift was received.  After the effort people make to select and send gifts to us, it's proper to spend some time thanking them for their thoughtfulness.

Some of these cards are for me to send and others are for a friend who needs some help making cards this year.  I used a brayer and embossing folders for the backgrounds.  Framing and mounting creates a nice, but easy card to produce.  Please help bring this tradition back to our friends and families.

Tuesday, December 22, 2015

Anniversary card

I think my family must be unusual, since we've had many weddings in winter.  There were 2 in the family celebrating 50th wedding anniversaries this month.  Feeling non-creative, I made both cards the same.
The cards were difficult to photograph.  Both the red and white cardstocks are pearlescent and have a nice shimmer.  The bells are die cut from glossy gold cardstock.  The sentiment was stamped on vellum and embossed with clear embossing powder.  The strip of vellum is mounted on a ribbon with gold edges.  The ribbon & vellum were wrapped around the top layer.

December 24th would have been my parents 100th wedding anniversary, if they were still with us.  I remember celebrating their 50th wedding anniversary soon after my brother's wedding.  Lots of memories.

Friday, December 4, 2015

Doxie Birthday

The holiday season is difficult for me, so I haven't been making many cards.  However, an event is coming up next week that convinced me to make a card.  My brother will be celebrating his 94th birthday.  We haven't seen each other for several years, but we do stay in touch.  As I was chatting with him on the telephone recently, my dog started barking.  He asked about the dog and we talked a bit about Tex.  Here is one of my all time favorite photos of Tex.
This was taken a couple of years ago and he is now 10 years old.  Here is the card I made for my brother.
I also added another image and message to back of card.
I colored the images with my Prismacolor pencils, but my old arthritic hands don't do a good job of that any more.  Happy Birthday, Loyd.

Friday, October 16, 2015

More stamping with water

If you haven't read my last post, please do so to better understand this technique.  I rubbed some Distress ink onto this piece of cardstock, using several colors, but it just looks sort of dark reddish orange.  I then stamped a large flower arrangement from Embossing Arts after spritzing stamp with water.  After allowing it to dry overnight, I could barely see the flowers.  I used a stamp positioner (since this is a wood mounted rubber stamp) and spritzed my stamp with water with gold Perfect Pearls added.  This time, the flowers are more easily seen.
I stamped the sentiment onto a strip of vellum and heat embossed it with gold embossing powder.  The ends of the vellum strip are taped to back of layer.  I then adhered this layer to a white card base.

Wednesday, October 14, 2015

Stamping with Water

This card uses a new technique to me.  I got this idea from Jennifer McGuire.  This technique is called Stamping With Water.  I used ivory cardstock and rubbed Ranger Distress Ink liberally over the surface.  I then sprayed water with gold Perfect Pearls added onto a leaf rubber stamp and pressed it into the surface, then repeated this to cover the surface.
I stamped the sentiment onto vellum and embossed with copper embossing powder.  I glued the ends of the vellum strip to the back of the top layer, then adhered to an ivory card base.

Monday, October 12, 2015

More Thanksgiving cards

After a little break to take care of personal things, I'm continuing to make cards for Thanksgiving.  With these, I made my watercolor backgrounds with more yellow in them.  I also mixed some copper Perfect Peals into some water in a Mini Mister and spritzed the finished background.  It adds a nice copper sheen to the background.


The leaves were sent to me by a friend on Gingerwood Bulletin Board.  I added some Tombow Power Tabs under some of the die cut leaves for a little dimension.  The sentiment is a Stampendous stamp with Versamark ink and copper embossing powder.


Sunday, October 4, 2015

Watercolor leaves

Using my stash continues with these cards.  I started by making the backgrounds with watercolors and a spritz of water with gold Perfect Pearls added.  When dry, I cut them out with a stitched rectangle die, then stamped the sentiment with Versamark ink and embossed with copper embossing powder.  Finally, I edged the backgrounds with the same ink and embossing powder.  I then mounted them onto ivory card bases.
On this card, I added 3 copper skeleton leaves from my stash.
 

These leaves were in my stash, sent to me by someone on Gingerwood Bulletin Board.  We lovingly call the Gingerbits.  These are fun little item from our own stash to share with another card maker.

Friday, October 2, 2015

Watercolor Thanksgiving

I made some more watercolor cards today.  I used Canson XL watercolor paper and Peerless watercolor papers.  I also spritzed them with water with gold Perfect Pearls added for a little sparkle to the background.  I then sprinkled salt (a combo of coarse & fine grain) over the wet surface and allowed it to air dry.  The salt creates the spotty surface of the watercolor background

 
I used some very old copper skeleton leaves from my stash.  The leaves were adhered with Multi Medium Matte liquid adhesive by Ranger.  I like this glue because it doesn't leave a shiny area when dry, so it doesn't show through the leaves.  I cut out the watercolor layers with a stitched rectangle die, then edged the outside with copper embossing powder to match the sentiment.

Thursday, October 1, 2015

Fall watercolor

I have to decided to try watercolor in fall colors.  I like to send Thanksgiving cards, so it's time to get started.  I'm also try to work with the Go for the Gold challenge that I started in the last couple of posts.
On this card, I used Peerless Watercolor papers and Canson XL watercolor papers.  I stamped the sentiment and the leaves with Versamark ink and used copper embossing powder for some shine.  I also added a rim of copper embossing powder around the edge of the watercolored layer before adhering to a cream colored base card.
On this card, I used the same watercolor procedure, but used gold embossing powder.  One of my leaves did not stamp well and left a gap in the center.  I attempted to add ink from a Versamark pen and more embossing powder.  It didn't work too well, but I will work on more cards.

Tuesday, September 29, 2015

Watercolor gold

I've been following Sandy Allnock's free classes on Go for the Gold.  I'm not really one who uses a lot of gold, but I decided to try it with this card.


I bought some of the watercolor paper that Sandy recommends for card makers - Canson XL.  I used the liquid watercolors by Dr. Ph. Martin that I've had for many years.   After coloring with 3 colors, I spritzed the paper with water with gold Perfect Pearls added.  When paper was dry, I cut it out with a Spellbinders die.  I then rubbed it with my embossing buddy - a little pillow filled with powder.  I stamped the flowers from Penny Black with Versamark ink and embossed with Ranger gold embossing powder.  Finally, I stamped the Hero Arts sentiment with the same ink and embossed with same embossing powder.

I started to mount the layer to a white card base and didn't like it.  I took Sandy's advice and rubbed Versamark ink around the edges and added the gold embossing powder.  I didn't get good coverage the first time, so I added more ink and more embossing powder.  I used Tombow Xtreme tape runner to adhere to base card.

Saturday, September 26, 2015

Another watercolor card

Today, I made myself make a card - first time in a couple of months.  I tried watercolor again.  I found several bottles of very old Dr. Ph. Martin Hydrous fine art watercolor.  It's a liquid with a dropper.  I dropped a couple of colors onto a plastic lid and added water.  I then brushed some onto damp watercolor paper.  The color was very intense, so I blotted some off with a paper towel.  I also spritzed the background with water with gold Perfect Pearls added.  I selected a portion of this and die cut it with a Spellbinders dies.
I used Versafine ink to stamp the flowers and sentiment, then added white embossing powder.  The butterfly is made with a Martha Stewart punch.

Sunday, September 20, 2015

Where have I been?

Since I've been missing for a while, I decided to give you an update.  I attempted to upgrade my computer from Windows 7 to Windows 10.  It didn't work for me and I decided to buy a new computer.  I still don't know how to use Windows 10, but will work on learning.  My backed up files are supposedly restored, but I can't find them.  I need to do some studying to figure out what to do next.  I haven't been making cards so there is nothing new to post.  Hopefully, that will come when I figure out how to use this computer.

Friday, August 7, 2015

Watercolor wheat field

I've been wanting to expand my watercolor cards.  This one took me a long time, but I have decided to quit working on it and get the card finished.  I made this card for an old friend that I knew when we both lived in Kansas.  Wheat fields bring back lots of memories.
I started this card with Twinkling H2Os to get a little shimmer.  I then tried to create a wheat field with watercolor pencils.  When I added the water with a brush, it blurred the wheat, but still gives the feel of a wheat field in the distance.  The larger sprig of wheat is a stamp from Serendipity and the sentiment stamps are by Hero Arts.

Saturday, July 25, 2015

Watercolor flowers

Since I mailed my final box of cards to Operation Write Home, I haven't attempted to make cards.  For anyone who doesn't know, OWH finished their mission and will not accept cards received after August 1, 2015.

I have family birthdays to work on, so gave watercolor another attempt.  This time, I used Twinkling H2Os that have been in my stash for many years.  I never thought of them as watercolors, but they really are meant for that.  I used to use them the color images.  On this card, I used them to create the background.  It has a pleasant shimmer, which doesn't show in the scan.
The flowers are Hero Arts stamps, colored with Marvy Markers, then spritzed before stamping.  The sentiment is by Penny Black, stamped with Versafine Onyx Black ink.

PS: I decided to take a photo of the card to show the shimmer of the Twinkling H2Os.

Friday, July 17, 2015

Life moves on...

I'm having a quiet day at home and enjoying the summer sunshine.  This morning, I spotted a lovely spider web suspended from my patio cover.  He's a tiny little spider, but has built an impressive web.  It even looks like he a caught a few insects in his web.
The sun shining through his web shows the lovely iridescence.  He must have worked hours building that lovely netting.  I'm sure he'll have to repeat this process again tonight because they always get destroyed during the day.  I don't know why I called him 'he'.  It's probably a female who does all this work.


Sunday, July 5, 2015

Patriotic thank you

Celebrating the 4th of July got me in the mood to make some patriotic cards for OWH.
This eagle is an old stamp from Viva Las Vegas Stamps that I stamped in Versamark ink and embossed with gold embossing powder.  The sentiment is a stamp from Inkadinkado.  The dies are from Spellbinders.  Stars are left over from a border punch.


Both the eagle and the sentiment are stickers from Pop-Ups.  Dies are from Spellbinders and the papers and ribbon are from my stash.

Saturday, July 4, 2015

Happy 4th of July!

In honor of Independence Day in the USA, I watercolored the American flag.  I turned it into a Thank You card for OWH for the July ODBD challenge.
 
My stamp had tiny stars on it, but my watercoloring obliterated them, so I added some punched stars.  The flag pole also turned out terrible, so I used a piece of cardstock to replace it.

Playing with watercolor, again

I managed to get to the big city and bought some new watercolor brushes this week.
My next step was to attempt to create a card, using the new brushes.  I used Arches Watercolour Paper and Peerless watercolor papers for this project.  I taped the paper to hardboard to keep it flat, then proceded to play with my new toys.


The sentiment is stamped with Versamark ink and embossed with white powder.  I also outlined the barn and tree with a brown Sharpie to show the details.  The barn and tree stamps are from Art Impression and the sentiment stamp is from an OWH set from Simon Says Stamp.  The finished image was cut out with a Simon Says Stamp stitched rectangle die and mounted to white card base with Tombow Xtreme tape runner.

Thursday, June 25, 2015

Watercolor Flowers

I'm still working on learning to watercolor.  This card was inspired once again by Sandy Allnock.  I have a long way to go before I get as good as she is, but I'm trying.  My 3 part rose stamps are by Papertrey Ink and called The Sweet Life.  I started by taping Strathmore watercolor paper to my hardboard to keep it flat.

I messed up my positioning of the stamps and left a mess in areas.  In my attempt to clean up the center area, I made a big mess, so I covered it up with a sentiment banner.
The dies are all by Spellbinders.  Inks are a combination of Marvy Markers and Distress inks.  Obviously, I have more practice time ahead of me.  I also need to shop for better brushes and try some other inks.

Tuesday, June 23, 2015

More watercolor practice

I'm still practicing with watercolor.  This time, I used Peerless Watercolor papers on Arches Watercolour Paper.  The stamps are by Art Impressions.
I'm not sharing all of my practice, but I'm still learning.  One thing I've found is that details don't work well with watercolor.  I need to try some, just letting the water do it's thing.  It's still controlling my plans.

Saturday, June 20, 2015

Watercolor learning experience

I've been watching technique videos and this one inspired me to dig out my old Art Impressions watercolor stamps and try it again after many years.  I bought some new Arches Watercolour Paper and my hardware store cut me a piece of hardboard from a scrap.  I taped the paper to hardboard with painter's tape and tried my luck.  Many years ago, I had learned to use these stamps with Marvy markers, then use water to spread the color.  That is what I used this time, but I sure need practice and will try this again.

I'm not fond of this one, but decided to share my attempt with you.  I don't like the placement of the sentiment, but I'll try again - maybe with different stamps.

Tuesday, June 9, 2015

One more challenge

Since I have decided to make one more box of cards for the OWH Finish Strong campaign, I also decided to participate in the June ODBD challenge for missing you cards.  This card also fits with Sandy's Sunday Story since I fell for it the first time.
Now, I'll try to make a few more missing you cards for the box.

Sunday, June 7, 2015

Embossing with color

I have many embossing folders that I have collected over the years.  I love the texture, but also like to make them colorful.  In the technique I used this week, I added color to embossing folders with words on them.

 
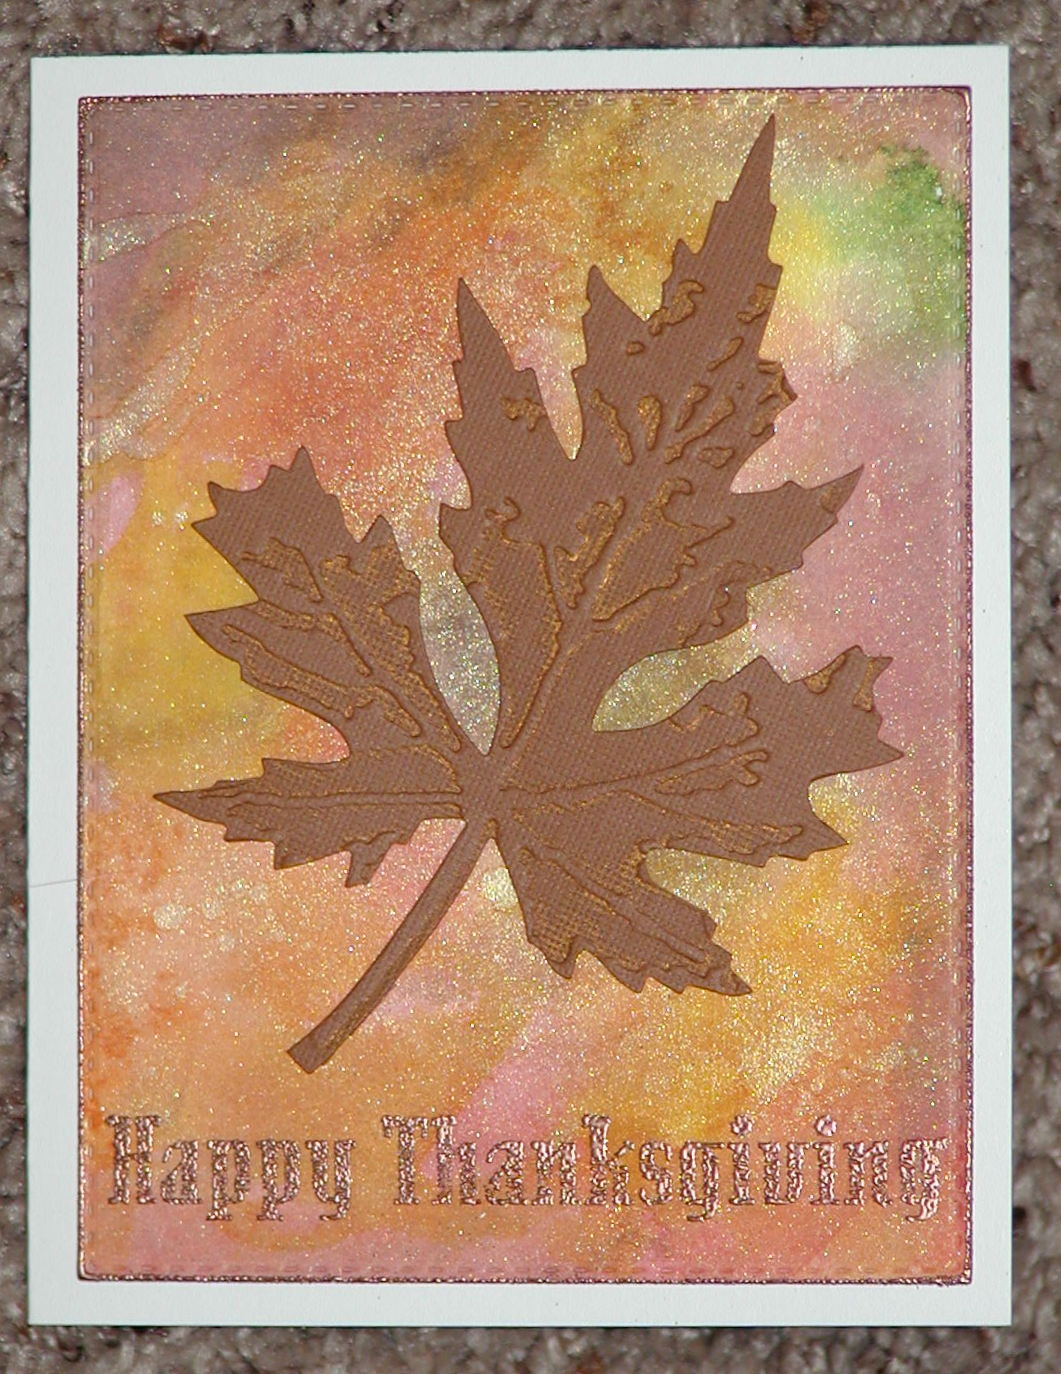
This folder makes a general card for the fall season.  I chose a Kaleidacolor ink pad in multiple autumn colors.  I used a brayer to roll the color from the ink pad to inside of embossing folder.  Tip: brayer ink onto inside with letters backwards so the words can be read.  I then placed a piece of cardstock into folder and ran it through the Big Shot.  I found that you get less slippage if you run the open end through the rollers first.

I repeated this with some other folders and different colors of ink.


I chose cardstock for borders that worked well with the ink colors.  You can see the slippage in some of these because I forgot my rule about putting open side first through the Big Shot.  I made multiples of all of these.  They are all mounted on either cream or white card bases.

Since I don't do videos, I decided to repeat the process to take photos.  I hope this helps to explain the process.


These photos show the brayering process.  My brayer and ink pad aren't wide enough for the folders, so I turn them upside down to ink the other side.


These photos show placing cardstock inside folder and running it through the Big Shot.


These show the finished product.  I will need to trim the edges to make room for a framing layer on an A2 card.  I use a pad of newsprint paper under the brayering to protect table.  Ink is water based and just washes off the folder and brayer.

Saturday, May 30, 2015

Looking for good news in life

I'm trying to find some good news along with all the sad news I've received recently.  This morning, I found my little cactus on the patio producing a lovely flower, larger than the plant itself.


I have 4 of these cacti in a pot on my patio.  They all have buds and love this hot summer sun.  They bloom during the night.  In the 2nd photo, you can see the small insect pollinating the flower.  Once, pollinated, the flower begins to close.  It's completely closed before noon.

I've made a couple of cards this week to send to family members with serious problems.


The dog in the bag is an unmounted stamp I apparently bought in a grab bag years ago  I've never used it before.  I didn't do a great job of stamping on this card, but it conveys the message.  The sentiment stamp is from Verses.  I'll have to try these stamps again when I'm not in such a hurry.