Friday, December 31, 2021
Tuesday, December 7, 2021
Peace on earth
In this year of turmoil, my wish now is to have peace, so this is how I created Christmas cards this year. I bought an angel die from Simon Says Stamp and a Peace die from Impression Obscession. I tried a variety of cardstock to cut the angel and sentiment and mounted them on an embossed background.
I used glitter cardstock, silver cardstock and holographic cardstock. On the last one, I rubbed gold ink on the embossed background. I mounted the design on a white base card and stamped a simple message inside.
Tuesday, November 30, 2021
100 Birthday Wishes
My brother will soon celebrate his birthday at 100. I would love to be with him, but neither of us are able to travel. I made a card for his big day.
The elements are all made with dies. The 12-point stars are cut from glossy paper with Hero Arts Infinity dies. The sentiment die is by Tonic. The number dies are very old ones from Sizzix and cut from glitter paper. I added some acrylic stars to the sentiment.
Sunday, November 7, 2021
Thanksgiving cards
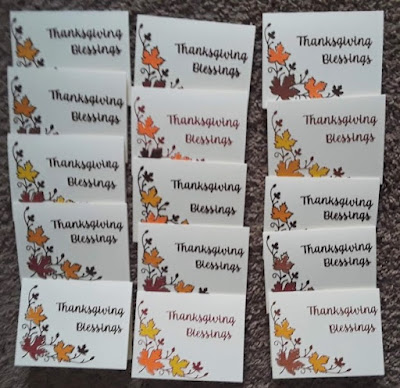
To save time this year, I made my Thanksgiving cards the same design. The Maple Leaf Corner die is by Simon Says Stamp. The leaves pop out, so they can be made in different colors.
I made a stack of them in similar colors. One of my frustrations was keeping the outline die from distorting when gluing it down. This makes the leaves not quite fit in the rest of the die. I found that it worked better to add an adhesive sheet to back of cardstock before cutting. When I added liquid glue to back of diecut, it got distorted.
I stamped this sentiment inside all the cards.
Thursday, October 28, 2021
Birthday card, finally
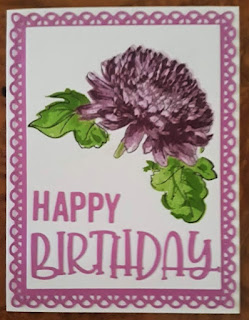
I wanted to create a special birthday card for a special friend. This is the finished card.
I could stop here, but wanted to show you the frustrating process of creating it. I started with this set of stamps from Altenew.
This involves stamping several layers on top of each other with different ink colors. I'm not good at getting them lined up and had quite a few problems. After stamping the flower, I cut a mask with the die that came with stamp set. The mask had a space around the image, so that when I added the leaves, there was a space. Here are some of my problems:

We all make mistakes in cardmaking, but the recipient only sees the finished product.
Tuesday, October 26, 2021
Thank you cards
My neighbor and good friend recently had a kidney transplant. She wanted to thank some of the good folks who helped her. I made some cards for her to send. I used 2 dies for these cards. The Maple Leaf Corner die is by Simon Says Stamp and the Thank You Flourish die is by Poppystamps. The leaves are loose, so they can be made is different colors.
Tuesday, October 12, 2021
Window birthday card
This special window card took a long time to make. To learn the technique, I suggest you watch Jennifer McGuire's video. My card isn't as well made as Jennifer's, but I tried.
This is the front of the card. The stamp, die, stencil set if from Altenew, called Inky Bouquet. The image is stamped on heat resistant acetate and embossed with gold embossing powder. The die is used to cut out image on cardstock. The acetate is glued behind the cardstock window.
The image is stamped inside the card, so that it is lined up with window. It is then colored using the stencil and blending brush. Another piece of cardstock with diecut window is glued to cover back of acetate. Please see Jennifer's video to learn the technique.Wednesday, September 29, 2021
Birthday cards
Once again, life has interrupted my card making time. I have managed to make and mail a couple of cards for family birthdays over the summer. I used backgrounds from my stash and added some diecuts.
Friday, July 23, 2021
Mini slimline trifold card
I haven't been spending much time in craft room because of health problems. I've managed to finish a birthday card for a family birthday. This is a trifold mini slimline card.
I left space for personal message inside of card.
Sunday, June 27, 2021
Mini slimline birthday card
I took some time enjoying the back yard and our lovely spring weather. I also did some sorting and reorganizing some things in my craft room. I also ordered some things online. I have some new window dies from Hero Arts. This card has taken me a few weeks to complete.
This is a mini slimline trifold card. I wasted a lot of cardstock trying to get the windows lined up. When you open the front section, you see the back section of the trifold.
That center piece is cut from holographic paper with birds and trees added with other diecuts. I left some space to write a personal message.
Saturday, May 29, 2021
Taking a break
I have taken a break from card making. I spent some of my time working in the yard and some of it reorganizing my craft storage. I trimmed and organized my card scraps and bought some new organization containers. I'm still involved in these things and will get back to making cards soon.
Trimming scraps and the first bag of trash,
Thursday, April 15, 2021
Learning about stencils
A while back I decided to try using the plastics stencils that are in popular use these days. I ordered some online and tried to create with them. I won't show the first few attempts. When I tried a set of 3 stencils to use with different colors, the results were disappointing.
I figured that I was doing something wrong, so I read the package and learned that there is a rubber stamp that goes with the stencils, so I ordered the stamp and waited for delivery. When the stamp arrived, I started over with this result.
Now, I wasn't sure what to do with it. After a week or so, I made this card by adding a frame and a sentiment. The moral of this story is: Find out all that is needed before ordering new supplies.
Wednesday, April 14, 2021
Cards for men
I went on a spending spree and bought some new things. I decided to try some of the stencils. I'm learning to use them, but haven't used them on cards. I tend to make personal cards for family members, taking their interests into cards for them. The stencilled backgrounds just didn't fit the people who were having birthdays this month. I turned to some alcohol ink backgrounds that I had made earlier and added die cut sentiments.
This sentiment die is larger than I imagined when I ordered it. It is from a company called Dienamix and also had shadows for the words. The shadows made them too large even for this 5"X7" card. Since this is a birthday card, I used that sentiment for the inside of the card.
Next, I needed a thank you card for a nice neighbor who helped me with my car.
I needed one more birthday card for a man, so I copied the design from the thank you card, with a different sentiment die.


