Sunday, January 30, 2011

Another Focal Point re-do


Before

After

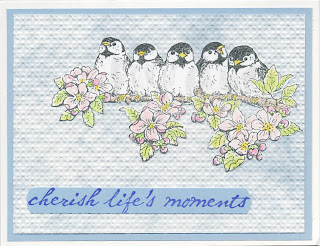
I made the bright yellow card nearly a year ago.  I now see that the flowers don't really show well, so I made a new card.  I used softer colors and grouped the flowers with leaves closer to the birds.   I think the focal point is more obvious, but I still need to work on this idea and see if I can get one that I really like.

I really like the Martha Stewart Birds border punch and need to work with it more.

Saturday, January 29, 2011

Design Seminar #1 - Creating a Focal Point


Before

After
Today is the 1st day of the Design Seminar on the Stars & Stamps blog.

I was not happy with the card on the left that I made a few days ago, but was unsure how to fix it.  Reading about Creating a Focal Point showed me where I had gone wrong.  The elements were too scattered and conflicted in creating a focal point.  I added the Thank You to a tag on the ribbon and stamped the eagle onto the blue paper with the silver embossing.  I then cut it out with a circle Nestibility and also cut a red frame slightly larger.  I decided to eliminate the USA sticker because it detracted from the eagle.

Check this out by determining where your eye goes first on each card.  Did I succeed?

Friday, January 28, 2011

Any Hero cards


I've made several more Any Hero cards with my new stars embossing folders, some red & white paper and ribbon.  This hero stamp is by Paper Inspirations and is stamped with Memories blue ink on white glossy cardstock.

I'm hoping to get some inspiration tomorrow from the

Thursday, January 27, 2011

Stars embossing folders


I recently ordered 2 more new embossing folders with stars.  Top left is a QuicKutz Strars folder.  The other two are made with a Craft Concepts Starry Night folder.  The eagles and Thank You are shiny silver and don't show well in the scan, so these are photos.  I've embossed on white core blue paper and sanded to show the stars.  Ribbons are from Michaels.

Wednesday, January 26, 2011

Stars

I'm working on getting some more cards made to pack up my box for Operation Write Home.  I got this new embossing folder by Craft Concepts, called Starry Night.  I embossed it on some white core blue paper and sanded it to show off the stars.   This eagle is an old unmounted stamp from a sheet that I bought in 2001.  I embossed the eagle in silver and cut it out.   The ribbon is from Michaels and the Thank You is a Class A'Peels silver sticker.  The USA is also a sticker.   I'll have to work on this design, but at least I got a card made.

Sad day in our small town

I spent most of yesterday in shock.  I live in a small town in southern Nevada.  We had some tragic deaths that rocked the community.  These were not close friends, but I have met them.  A husband and wife were found dead in their home, with rumors of murder/suicide.  Details are being withheld until the investigation is complete.  I won't give more details because the family deserves some privacy at this time.

My reason for mentioning this is that this news has stepped on my creativity.  I just can't seem to design cards at this time.

Monday, January 24, 2011

Another punched frame


I like these punches from Fiskars that make corners and borders with the same punch.  They also have corner slots for inserting an image. 

If you glue them carefully to your card, the insert can be changed.  It's nice to be able to change a message to fit the occasion.  You have to cut your beginning rectange to even numbers.  I cut this one 3" X 4" and the insert is about 2" X 3".

With this punch, you have the little branches from the corners to embellish your card.

S&S Sketch #53, with tutorial

Today's card is for the Stars & Stamps challenge for Sketch #53.

I've had several requests for more info on how I make the punched corner frames.  You can see more of them in this post.  For this reason, I have taken some photos while making this card.
 
I like the Corner Adorner punches for this because of the frame that makes placement easy.  Just fit the corners into the punch, punch and rotate to punch all corners.  They will be evenly spaced for an insert.
Measure the opening for insert placement.

 
 Measure the space between the punches, in both directions.  Cut your insert to this size or slightly small to make insertion easier.

The back side is not too attractive, so this is best used as a layer.  If you punch these corners in the base card, you will probably want to line the card to cover the back.


Attach the framed image to the prepared base card.  This image is from a clear $1 set of stamps.

Sunday, January 23, 2011

Spring Chickadees

This stamp (Chick-a-dee Blossoms) is from Penny Black in 1999.  I've always loved it, but never made a card with it before.  I stamped it in black ink on white cardstock and colored it with Prismacolor pencils, then cut it out - the hard part. 

It seemed like it needed to be on a sky background.  I tried embossing it for texture, but couldn't stamp the message, so I used another piece of cardstock for that.  I like it better with the message stamped directly on the sky background.  The message stamp is from a set by Hero Arts.

Friday, January 21, 2011

More of the Green!

I don't make many St. Patrick's Day cards, but I enjoy making a few of them.  This stamp with the open lettering is an old unmounted one and doesn't give a great image.  The hat is an old foam stamp, but I added a black band and the shamrock gem to dress it up.  I added the green to the embossed swirls with a Brilliance Gamma Green ink pad.

Wednesday, January 19, 2011

St. Patrick's shamrocks

This was a fun card to make.  The background is embossed with a SU Sizzix embossing folder.  The shamrock is stamped with a foam stamp, but turned out pretty well.  The saying is an unmounted stamp that came in a set of holiday sentiments.  The circles and ovals are cut out with Nestibilities.  The other frame on them is some of the heavy weight textured cardstock in a metallic gold.  The little gems are adhesive backed.

OWH Midweek Throwdown

Today's challenge on the Stars & Stamps blog is to make a white on white card, with a pop of color.  This isn't my favorite type of card, but I gave it a try.
This type of card works for sympathy and weddings, but neither of those are appropriate for Operation Write Home.  I chose Anniversary.  I think I'll move back to making colorful spring cards.

Playing with color

I decided to play with color and do a nearly monochromatic version of the OWH sketch #52.  I made this previously in red.  I just needed a pop of pink on this card.  Those flat sparkly gems have a pink ting, as well as the stamped flower.  The vertical ribbon is another velvetty ribbon from Christmas decorations.

Tuesday, January 18, 2011

More cards from the past

While going through the stack of cards I have made and never mailed, I found these:
A few years ago, I was teaching needle tatting and card making classes at a local craft store.  At this time, I tatted this shamrock and added it to a card.  The metallic gold circle was cut with a punch and I wrapped some of the same tatting thread around the scallops.  The mulberry paper was wet with a wet cotton swab and torn into a circle.

I wonder if these old stiff fingers could still make that card.


This card was embossed and cut with a Spellbinders Die.  The center part is stamped on a pearlescent paper.  I don't remember how I colored it, but probably by using the die as a stencil and probably with chalk.  The colors are very soft.  I'll have to see if I can still do this, since I still have the die.

Monday, January 17, 2011

OWH Sketch #52

This weeks sketch on the Stars & Stamps blog is #52.
Here's my rendition of this sketch:
I always have problems with sketches and don't use them often, but this is a special challenge and I want to participate.  The dark red at the bottom of card is the heavy textured cardstock from my stash.  The stripes & dots are from a Mat Stack.  The vertical dark red is a piece of velvet ribbon from Christmas.  The Happy Birthday circle is a Hero Arts stamp from 1998.  Circles are all cut with Nestibilities and the button is from my stash.


Card lining tutorial

I frequently have need to attach a liner to my greeting cards, because I enjoy using dark cardstock that is difficult to write a message inside.  Since I lined a whole stack of cards last night, I took photos of the process I use.  Forgive the photos, since I was using camera with one hand and doing the process with the other hand.

I start by cutting a lining paper (pastel, text weight) slightly smaller than the card to allow me a little room for error.  I use a rotary trimmer with a deckle edged blade for this.  Then, I run these liners through my Xyron 900.  I chose this machine because my liners are just less than 8 1/2" and the 900 cuts to 9".  I leave a small space between the liners. 

I use a burnisher to rub the finished product on both sides, before removing the top clear plastic covering from the card liners.  This seems to secure the adhesive to the back of liner and keeps the excess adhesive on the clear plastic, which is removed and discarded.

 I have several of these burnishers that I use interchangably.  The clear and blue ones were purchased from art supply stores and the red & white one is a scraper from the grocery store.  They need a smooth straight edge and a way to hold them firmly in your hand.
  
Step 1

Step 2

Step 3
Step 4


After cutting the liners apart and removing the clear plastic cover,
 
Step 1: I fold back a small section of the white base sheet under the card liner and lay it over top of opened card.  I can see through this white base sheet to place evenly over the card, with all edges showing.  Adhere the adhesive backed line to the card at the exposed end. 

Steps 2 & 3: Using the burnisher, I slowly pull back the base sheet, while sliding the burnisher along to follow. 

Step 4: The finished lined card will show a border all the way around the liner.
 
Step 5
Step: 5. I place my open lined card onto my Scor-It and score the center where card will be folded.  Fold card on this score line and crease the fold with a bone folder.

These are the finished cards, all lined and folded.

Sunday, January 16, 2011

Cards from the past

These are some cards that I made a few years ago and never mailed, but they are in good condition.  They were on dark cardstock, so I spent the evening lining them with light colored paper to make them easier to write in them.  There are a variety of techniques in these cards.  Many of them are made with paper punches or iris folding.  Some even have paper piercing.  Now, I have to get them stamped on the back.

Still using my supplies

While digging through unused card parts, I found these cards that I had punched the corners and never used, so I combined my paper sculpted flowers with them.  Since these were punched through to the inside, the  cards had to be lined.

I have more of these, but won't bother you with all of them.  I also found some unmailed cards that I had made and will just line them and use them for the troops.  When I get them ready, I'll try to get a photo of the collection.


Friday, January 14, 2011

Spring has Sprung


Spring isn't quite here, but when making cards for Operation Write Home, we start early.  Actually, any time I'm making cards for a holiday, I choose to start early.  This is one of my pet peeves about the stamping companies.  The products that I need for making cards early frequently aren't available.  I wish they would sell things early enough to get things finished in time to use them.

On the Stars & Stamps blog, we are challenged to use things that we have on hand to make room for new things later.  For these cards, I dug out my old Sizzix dies for paper sculpted flowers.  I've had these things for years, but haven't used them lately.  I also used a Corner Adorner punch that I have had a long time.


Thursday, January 13, 2011

More masculine cards

I'm still using this heavy, textured cardstock that I found.  This time I used black because it goes well with this camouflage ribbon.  I kept the cards very simple so they would be more masculine.  I did line these cards because the green cardstock is pretty dark.