I've once again been away from card making and blog updates for quite a while. Health problems continue to affect my life. I'm been wanting to make cards for family birthdays, but just don't feel that I can do a good job. I found a technique on Kristina Werner's blog that I wanted to try. My first attempt was a failure:
The background turned out okay, but I had problems stamping the sentiment. Stamping on watercolor paper can be difficult because of rough texture of the paper. I attempted to use a stamp positioner and stamp it again over first stamping. It wasn't perfectly lined up and gave a double image. Next, I used a Versamark pen to fill in blank areas and more gold embossing powder. This resulted in an unreadable sentiment, so I started another card:
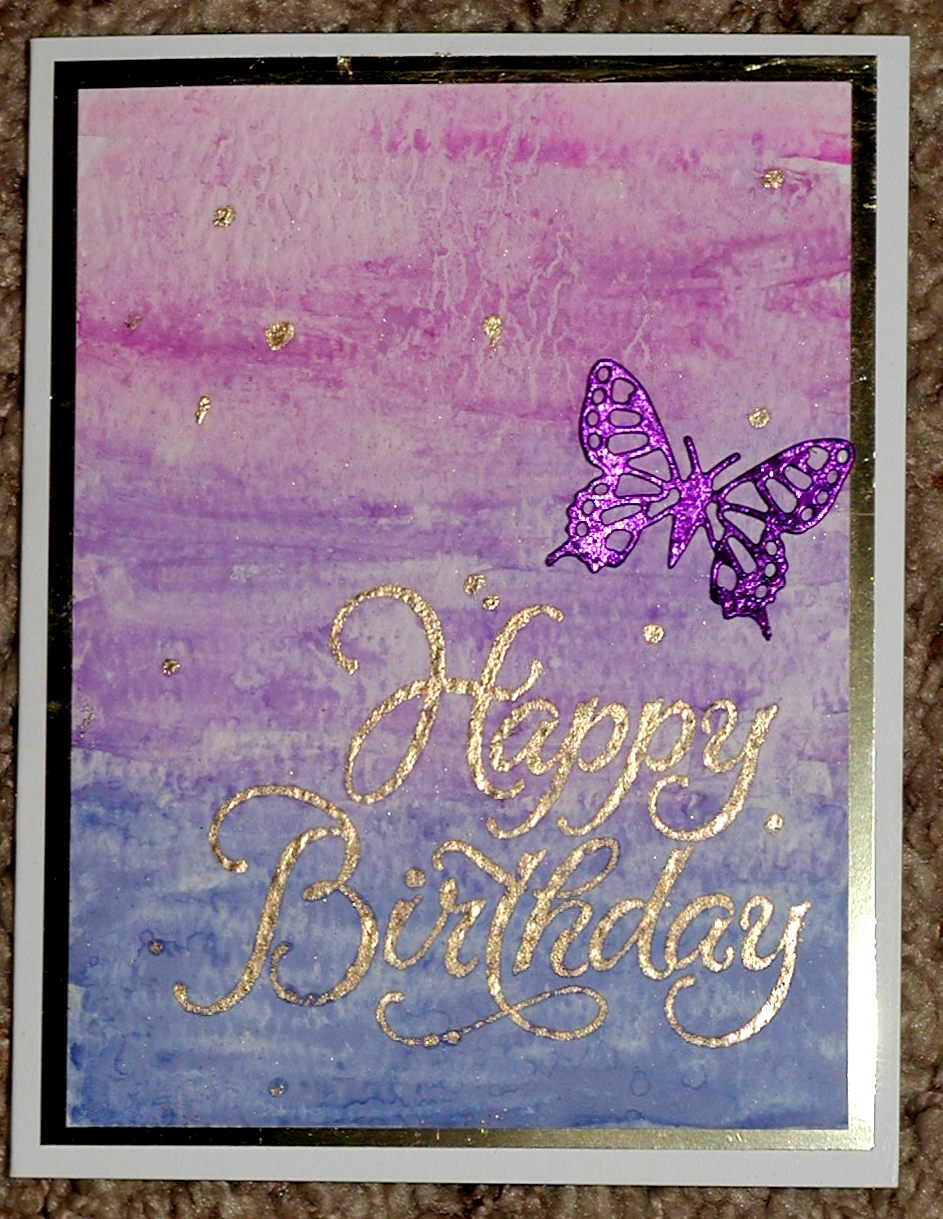
This time, I accepted the first stamping and made it into a card. The border layer is gold glossy paper and mounted on a white card base. The butterfly is made by adhering a shiny candy wrapper (from dark chocolate Hershey Kisses) to cardstock and cutting it out with a die. I adhered only body to card, so the wings can be raised.
This process finally convinced me to order a Mini Misti to make correcting stamped images easier. I'll try this again after it is shipped to me. Wish me luck.
Sunday, July 31, 2016
Wednesday, June 8, 2016
Desertscape
I finally forced myself to make a card. Today is my brother's 80th birthday and I thought I owed him a card. This is another watercolor card and the desert is because he lives in the desert.
Monday, May 9, 2016
Hang in there!
I've been making progress on health problems and enjoying spring weather in the desert. I finally got back into my craft room to make a card. This is for a friend who's on chemo.
This House Mouse image was colored with Twinking H2Os on water color paper. The background was made with Distress Inks. The shimmer doesn't show in this photo, so I used a flash to show the shimmer.
Saturday, April 2, 2016
Evolving cardmaking styles
The style of my cardmaking has evolved over the years. As a beginner, I was making cards for specific people and considering each person's interests in the design. Then, I began following trends and copying the styles of other cardmakers. When I began making cards to send to strangers through Operation Write Home, I tried to guess what recipients may enjoy. Now that OWH has ceased the mission, I'm getting back to creating cards for specific recipients.
I have a male family member who is very concerned with motorcycle safety. He objects to black bikes with the bikers wearing all black clothing. This makes them harder to see by drivers and can create opportunities for accidents. Here is the card I made for his birthday.
I gold embossed the image from Stamper's Best onto the glossy blue cardstock oval. Orange frames are also die cut from glossy orange cardstock. The green stripes are to represent green areas along highways. The sentiment is a glossy gold sticker.
Next, I had a female relative with an upcoming birthday. She loves her flower garden. I made her card with the watercolor lifting technique and iris rubber stamps from Stamp-A-Mania. The sentiment stamp is by Hero Arts.
I have a male family member who is very concerned with motorcycle safety. He objects to black bikes with the bikers wearing all black clothing. This makes them harder to see by drivers and can create opportunities for accidents. Here is the card I made for his birthday.
I gold embossed the image from Stamper's Best onto the glossy blue cardstock oval. Orange frames are also die cut from glossy orange cardstock. The green stripes are to represent green areas along highways. The sentiment is a glossy gold sticker.
Next, I had a female relative with an upcoming birthday. She loves her flower garden. I made her card with the watercolor lifting technique and iris rubber stamps from Stamp-A-Mania. The sentiment stamp is by Hero Arts.
| Photo - no flash |
| Photo with flash |
| envelope |
Thursday, March 17, 2016
Watercolor birthday
I managed to finish one more birthday card with watercolor lifting technique. I used Distress inks and an old Penny Black floral stamp. The sentiment is a rubber stamp from Stamp-a-Mania.
This card could be used for other occasions, but I put a birthday message on the inside.
Tuesday, March 8, 2016
More birthday cards
I had a little interruption in card making with a storm that knocked out our power for 16 hours. Fortunately, most of the time was at night and I could stay warm in the bed. The harder part was that I could have nothing warm to eat. When the power returned, I really enjoyed a hot cup of tea.
I have now made 2 more family birthday cards, but have a few more to go.

The butterfly card was made like the last post, with watercolor lifting. The Snoopy card was made by brayering ink into embossing folder to transfer color. I used a die to cut hole in top layer to expose stamped Snoopy under it. The pinked circle was a die with same circle die for inside.
I have now made 2 more family birthday cards, but have a few more to go.
The butterfly card was made like the last post, with watercolor lifting. The Snoopy card was made by brayering ink into embossing folder to transfer color. I used a die to cut hole in top layer to expose stamped Snoopy under it. The pinked circle was a die with same circle die for inside.
Saturday, February 27, 2016
Watercolor lifting
It's been a long winter for me, but springtime weather is making me feel better. I can't make the cards as in the past because of arthritic hands, but I'm trying. I saw this technique of watercolor lifting on Jennifer McGuire's blog. It took me several tries, but here's the card I finished.
I made the butterfly with foil candy wrap (Hershey's dark chocolate kisses) that I bought last fall. I saved some of the wraps because they were so pretty. I ran a piece of purple cardstock through my old Xyron and used that adhesive to adhere the foil. I then cut it out with a Spellbinders butterfly die. I used Distress ink pads to create the background. You can go to Jennifer's blog to see the video on the technique.
I hope to try this technique a little more because I have several family birthdays coming up.
| Inside of card |
I hope to try this technique a little more because I have several family birthdays coming up.
Friday, January 29, 2016
Tired of winter
Winters are a difficult time for me. I don't like the long, dark nights and the cold weather makes my joints hurt. The arthritis in my hands makes card making difficult in cold weather. I am happy to say that the days are getting longer and we are starting to see more sunshine. Last weekend, there was a balloon festival in my home town. To my surprise, the wind was right to bring the balloons into my part of town. As you can see from the photos, it was a cloudy day without our normal blue sky. Even the birds were cold and huddled on the street lights.
One balloon even dropped below the palm trees. They were pretty, but would have looked prettier with blue sky behind them.
I managed to make my first card in a month and it helps me to get focused on all those supplies that are taking a lot of room in my small home.
I mostly used the stitched rectangle dies from Simon Says Stamp. The sentiment is a very old stamp from Penny Black (2004).
Saturday, December 26, 2015
Thank you cards
This is the time to send thank you cards. Have you noticed that fewer people send them these days. I blame the ease of social media. All the technology makes it easy to send a quick message that gift was received. After the effort people make to select and send gifts to us, it's proper to spend some time thanking them for their thoughtfulness.
Some of these cards are for me to send and others are for a friend who needs some help making cards this year. I used a brayer and embossing folders for the backgrounds. Framing and mounting creates a nice, but easy card to produce. Please help bring this tradition back to our friends and families.
Tuesday, December 22, 2015
Anniversary card
I think my family must be unusual, since we've had many weddings in winter. There were 2 in the family celebrating 50th wedding anniversaries this month. Feeling non-creative, I made both cards the same.
The cards were difficult to photograph. Both the red and white cardstocks are pearlescent and have a nice shimmer. The bells are die cut from glossy gold cardstock. The sentiment was stamped on vellum and embossed with clear embossing powder. The strip of vellum is mounted on a ribbon with gold edges. The ribbon & vellum were wrapped around the top layer.
December 24th would have been my parents 100th wedding anniversary, if they were still with us. I remember celebrating their 50th wedding anniversary soon after my brother's wedding. Lots of memories.
The cards were difficult to photograph. Both the red and white cardstocks are pearlescent and have a nice shimmer. The bells are die cut from glossy gold cardstock. The sentiment was stamped on vellum and embossed with clear embossing powder. The strip of vellum is mounted on a ribbon with gold edges. The ribbon & vellum were wrapped around the top layer.
December 24th would have been my parents 100th wedding anniversary, if they were still with us. I remember celebrating their 50th wedding anniversary soon after my brother's wedding. Lots of memories.
Subscribe to:
Posts (Atom)