
Monday, April 25, 2011
Ruffles card remake
I wasn't really pleased with the card in the previous post with the ruffles. I always have trouble with combining patterned paper. I tried it again with a solid layer between them and toning down the patterns a bit. I also found the punch I wanted to use on the previous card. Here's the result:
 This still isn't my favorite card, so I think I'll move on to something else.


Saturday, April 23, 2011
OWH Challenge cards
Operation Write Home is sponsoring several challenges today on Facebook to try to stimulate our mojo. Mine has been seriously lacking recently, so I've tried to do the challenges. Some cards worked out better than others. Here's my results:
 The first card was a Food Challenge. I used this cupcake stamp and paper pieced it. The circles are the Pinking Circles Nestibilities. These are on sale in a lot of online stores. I guess they didn't sell well, but I love them.
The second challenge was to make a card inspired by this picture . I saw lots of pastel ruffles and made this card:
 I wasn't really pleased with this card, so I'll see if I can make a better one later. I did add a pink ribbon over the purple one to soften it a bit.

 The 3rd challenge of the day was to make a Weather Inspired card. I made the sun with 2 punches, popped on foam mounting tape. I also scored the blue card with my Scor-It board and highlighted the score lines with a bit of Brilliance yellow ink. The Hedgehog stamp is by Penny Black and colored with Prismacolor pencils. The sentiment stamp is also from Penny Black.
Our next challenge was to make masculine cards or cards that aren't too feminine. I used a 12 X 12 sheet of scrapbook paper and cut out 3 sections across the top. Here's my cards.

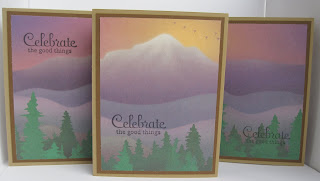 Now, I have the lower half of the paper to use. It is all trees, so I'll have to think about that for a while. My mojo has really been pushed today, so I'll let it rest a bit and celebrate Easter. Happy Easter to all.

The second challenge was to make a card inspired by this picture . I saw lots of pastel ruffles and made this card:


Our next challenge was to make masculine cards or cards that aren't too feminine. I used a 12 X 12 sheet of scrapbook paper and cut out 3 sections across the top. Here's my cards.


Friday, April 22, 2011
Red Baron Birthday card

Success!!! I managed to make a card for my other brother-in-law. Since I don't like to color images (and I've colored this one before), I used paper piecing this time. It takes a lot of cutting and gluing, but I like the finished product. This stamp is made by Stampabilities.
Now, I'll see if I can keep my mojo going and make some more birthday cards.
Tool sticker card
I've been struggling with mojo for a couple weeks. It came back this morning. I used to make all cards for a specific person and make them personal. Recently, I have been doing groups of cards for people I don't know. That's when I lost my mojo.
Today, I made a card for my brother-in-law, who used build homes and is now in a nursing home. I used some stickers from Sticko (EK Success).


Today, I made a card for my brother-in-law, who used build homes and is now in a nursing home. I used some stickers from Sticko (EK Success).

The sentiment is stamped on a balsa wood business card. I've had a stack of these for years, but haven't used them lately. I punched holes in the corners and inserted brads. The tool corners stamp is an old unmounted one with no label. I just stamped it in the corners, put the brads through both layers, then mounted them onto black, then on a tan base card. The hammer and screwdriver stickers were added last. Here's the finished card.

Now, I have another brother-in-law card to make. Hope the next one works for me.
Wednesday, April 20, 2011
The Rest of the Star Story
Recently, I made a Star Card and decided to finish it up. Here's my finished card, ready to mail - no envelope - just put it in the box for Operation Write Home.


Thank you square is only attached at upper right corner, so it can be opened and closed again. I wrote a note to the troops on the back. I'm aware that this is a 6 pointed star, but it still serves my purpose.
Tuesday, April 19, 2011
Poor Eagles

I've still been keeping an eye on the Eagle Cam in Decorah, Iowa. The 3 eaglets are growing fast and doing well. However, it appears they have had snow in Iowa. Mama doesn't look very happy. The camera has been covered with snow all morning and this is the first glimpse we've had of her.

Yesterday, it took both Mom & Dad to keep them fed. They grow fast and are getting feathers to replace the down that the had earlier. Hopefully, the weather clears up and they can get back to their schedule.
Sunday, April 17, 2011
More Sticker Cards


I made this card yesterday, after being inspired by Jan's sticker cards from the blog skip. These hibiscus stickers are from a sheet of stickers that I bought on a trip to Hawaii a few years ago. The colors are very vibrant and I found it difficult to find cardstock that would show them off properly.
I chose 3 stickers in the same color and mounted them onto white cardstock and cut them out with the circle Nestibilities. The white flowers work well with the white cardstock borders. I used this metallic cardstock to frame the elements. I keep wanting to add more embellishments, but may just keep it the way it is. What do you think?

I made this card last year for a man, using the tool stickers from a sheet I found at Wal-Mart. The 'tool belt' is made from brown cardstock with some added distressing to make it look used. I added faux stitching with a sharpie marker and brads for the rivets. This is the front of an A2 size card.
Saturday, April 16, 2011
OWH Blog Skip

1. OWH Stars and Stamps blog.
2. Barb at Paper Therapy Ponderings
3. Erica at Creative But Messy
4. Jan at Jan's Gone Stamping
5. Sherry at Bits of Cheer
6. Julie at Handmade by Julie
7. Velda at OldStamper Musings - (You are here)
8. John at John VM's Cards
9. Steph and Robin at SR Cards
10. Paula at Handmade by Paula
11. Samantha at Expressions of a Craftaholic
Today we are sharing with you ways to use stickers wisely on our cards. My recommendation is to choose good quality, appropriate stickers - not those made for kids to play with. You can find these in stores that sell stamping and scrapbooking supplies or online. Stampendous has some very nice stickers. Just do a search and you can find lots of others.
Treat the stickers with respect and consider them part of your design, not an add-on to fill a blank space. Some stickers are too lightweight to stand alone, so put them onto a piece of cardstock and cut them out. If your sticker doesn't have adequate adhesive, add your own.
 I chose a sticker from this sheet by K & Co. I placed the circle sticker onto a piece of neutral cardstock. I then cut it out with a circle Nestibility, using small pieces of painter's tape to keep it lined up. I distressed the edges a bit, so the cardstock will blend with sticker.
 I made the card, using layering and embossing. The sentiment is stamped with a Hero Arts rubber stamp and Memento Bamboo Leaves ink. Edges are distressed with some of the same ink. I added the butterfly sticker, using foam mounting tape to make it more 'on top' of the other elements. You may need to put the sticker on cardstock and cut it out for stability.
 I added a liner to inside of card with smooth writing paper because card is textured. I embellished the liner with some stickers from a coordinating set of borders and corners by K & Co.
 Finally, I added a small bow to soften the entire card.
Tip: You should be able to click on any of the photos to make them large enough to see the details.
 For this card, I choose these metallic corner stickers from Starform. I just stamped an embossed gold sentiment in the middle of red cardstock and placed the stickers in the corners.
 This background paper is an old one from my stash, when I was practicing techniques. Save them, you never know when they will work for for another card design. I had brayered Liquid Applique onto a card and heated it. Didn't like result, so I sprayed on some black webbing.
I added some layering and ribbon for a completed card.
 This card was made using metallic stickers. The dragonfly is from Class A'Peels and the Happy Birthday is from Starform. The background is from my stash and I'm not sure how I made it. It's on black glossy paper and either Marvy Metallic markers or Lumiere paint were daubed on. I have a lot of these old backgrounds that I've saved from my experiments over the years.
Now, to continue on the OWH Blog Skip, take a jump over to John's blog.
Friday, April 15, 2011
Iris Thinking of You

Wednesday, April 13, 2011
Iris Birthday Card

I found this background in my stash that I made several years ago. By checking out the colors, I think that I used Marvy Metallic markers on acetate, then smooshed the black glossy cardstock between the layers. I used a black layer under the background and put it on a lavender base card to highlight the colors.
The Marvy Metallics can be put directly on the rubber and stamped. I used this solid iris stamp by Stamp A Mania on black cardstock. I attempted the sentiment, but the details get run together. I used a copper Encore inkpad for the Happy Birthday.
The glossy layering really makes everything pop and the ribbon pricks up the purple in the background. Both image and sentiment are raised with foam mounting tape.
I'd love to make more of these, but will go onto use other backgrounds from my stash of samples.
Subscribe to:
Posts (Atom)