Sunday, December 18, 2016

Changing seasons

Since I live in the southern Nevada desert, our seasonal changes are different than in many areas.  We had beautiful fall colors until yesterday.  These photos were  taken 2 days apart in my front yard.  We had a small amount of rain during the night and lots of wind.  A few of the leaves are piled against the fence, but most are being shared by neighbors down the street.


While the wind was blowing and leaves were flying outside, I decided to make some cards that will probably arrive at their destination after Christmas.


Wednesday, December 14, 2016

Seasonal cards

We have each been raised with our cultural differences.  I was raised to believe that we celebrate Christmas because of our Christian beliefs.  I realize that others have different beliefs, so I do make seasonal cards for people who do not celebrate the holiday season in the same way.  Here is a card I made to send to others during the winter season.
I embossed this glossy paper with a snowflake embossing folder, then patted white Brilliance ink onto the raised snowflakes.  Glossy paper does not photograph well.  The color is really much closer to the other colors on the card.

Tuesday, December 13, 2016

Christmas cards

I've received many nice cards from other card makers on Gingerwood Bulletin Board.  They have been trying to inspire me to make cards again.  Last month, I received a birthday card from one of them.  I was impressed by the stamp and die set that she used, so I asked where she got it.  It was the Fancy Banner set from Taylored Expressions.  I had never been to their website and was very impressed.  I ordered the banner set and will try to use it soon.  I also bought a Nativity Die and liked it so much that I made Christmas cards this year, first time in years.  I made them all alike, except that some are cut from gold glossy paper and some from silver glossy paper.


The sentiment is an old rubber stamp from My Sentiments Exactly.  I removed this portion from the wood and used it with my Mini Misti stamp positioner.  The edges of top layer are rubbed with Versamark Ink and dipped in embossing powder.  This gives a nice edge on that top layer.

Time will tell if I succeed in continuing to make cards.  I'm impressed by the quality of the dies from Taylored Expressions and may need to get more of them.

Thursday, December 8, 2016

Birthday Boy

I haven't been making cards for some time.  I was motivated to begin again because my brother will soon turn 95.  I've been making cards for his birthday for many years, so I couldn't stop now.  I used a card base that I made a few months ago and embellished it.

The card was made with watercolors and I added the balloon stickers.  I mounted the balloons onto cardstock, then popped them up on dimensional tape.  I placed the gold embroidery floss between cardstock and dimensional tape, then tied a knot and glued it down with liquid adhesive.

Thursday, September 29, 2016

Watercolor Fall cards

I've been waiting for inspiration to make cards again.  Since it's getting to be fall weather, I'm trying to make Thanksgiving cards for family.  I found a technique that I decided to try.  Here's my inspiration from Jennifer McGuire's blog.

Since I'll be using watercolor paper, I decided to use my Mini Misti tool, since stamping on watercolor paper more difficult to get a good image.  Since my stamp was a wood mounted rubber stamp, I had to remove it from the block.  I then used Wackytac (a temporary liquid adhesive) on the rubber and let it dry.  This did keep the stamp in place until I removed it later, leaving no residue.

I used a very old two toned embossing powder by Moon Glow, called Sunrise Salmon/Gold with Versamark ink.  I then followed Jennifer's technique of applying Distress ink with my fingers.  I used a variety of colors, but didn't write them down.  I embossed with an embossing folder, sandwiched with a Tim Holtz embossing diffuser.  This is and acrylic piece, with and oval removed from the center.  This allows a flat area for the sentiment.  I also traced inside the oval with a gold pen.
 

The next 2 cards were done using the same technique, but using white embossing powder.  The second card was debossed by mistake (folder upside down) and the third was embossed properly.  I then tapped some ink onto the raised areas.

I'm going to study these for a while before making more cards with this technique.  As Jennifer says in her video, the ink does wear off your fingers.


Sunday, September 18, 2016

Friends in nature

In case anyone wonders, I'm still doing fine.  I just haven't had a desire to make cards.  I've evolved many times in my life.  I'll be passionate about something for a while, then lose interest and find other things to fill my life.  I'm enjoying my little dog, Tex, and spending time in my yard.  Desert weather has cooled for fall and I've been trying to revive flowers and shrubs.  I discovered one of the many wonders of nature recently.
The praying mantis was just resting quietly on an oleander leaf, just below the flower.  This is one of our friends in nature.  They aren't often noticed while they sit quietly on a leaf eating other insects.  We must pause our busy lives so we can be aware of lovely occupants of our yards.

Saturday, August 6, 2016

Learning with new tool

I discovered in the last post that I had problems stamping on textured watercolor paper, so I ordered a Mini Misti to help with my stamping.  This is my 'learning to use it' post.  I made 2 cards, using previous technique.
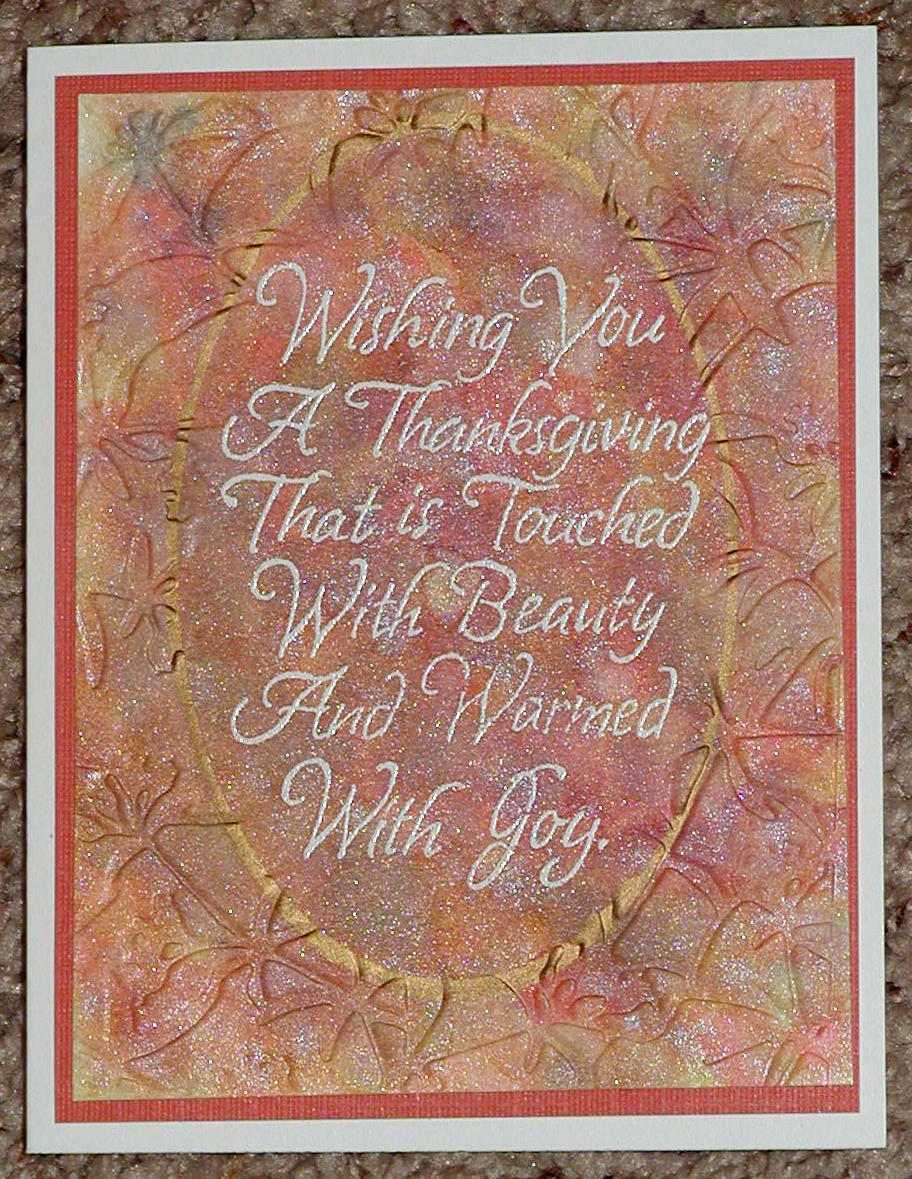
The background is made with watercolors brushed onto watercolor paper.  After the card had dried, I spritzed it with water with gold Perfect Pearls added.  After allowing for drying, I trimmed the background to card size and placed it in my new Mini Misti.  I made my first mistake.  This was a wood mounted rubber stamp.  I peeled rubber image off the wood and adhered it to what I thought was a cling background.  It wasn't and wouldn't remove from the Misti.  I finally tried UnDu adhesive remover and was able to clean off stamp and Misti.  Lesson learned!

Before removing the stamp from Misti, I stamped image onto background with Versamark ink and repeated inking and stamping.  I then embossed with gold embossing powder.  Image was still not sharp enough, so I added more Versamark ink and more embossing powder.  I mounted the watercolored image to glossy gold cardstock and then to a ivory card base.  Now, to try another card.
My friends on Gingerwood Bulletin Board have suggested making some sympathy cards to have in my stash because we often don't feel like making them when we need them.  Using my new tool, I placed the sentiment where I wanted it on the card, then closed lid on Misti to adhere the cling stamp to the lid.  I stamped, reinked & stamped again about 5 times with Colorbox Raven Black ink to get a good image.  I then added clear embossing powder.  Next, I placed the wheat stamp where I wanted it and closed lid.  This one only took 2 inkings and embossing powder.  I adhered this to blue cardstock and a white base card.

Sunday, July 31, 2016

Watercolor birthday card

I've once again been away from card making and blog updates for quite a while.  Health problems continue to affect my life.  I'm been wanting to make cards for family birthdays, but just don't feel that I can do a good job.  I found a technique on Kristina Werner's blog that I wanted to try.  My first attempt was a failure:

The background turned out okay, but I had problems stamping the sentiment.  Stamping on watercolor paper can be difficult because of rough texture of the paper.  I attempted to use a stamp positioner and stamp it again over first stamping.  It wasn't perfectly lined up and gave a double image.  Next, I used a Versamark pen to fill in blank areas and more gold embossing powder.  This resulted in an unreadable sentiment, so I started another card:
This time, I accepted the first stamping and made it into a card.  The border layer is gold glossy paper and mounted on a white card base.  The butterfly is made by adhering a shiny candy wrapper (from dark chocolate Hershey Kisses) to cardstock and cutting it out with a die.  I adhered only body to card, so the wings can be raised.

This process finally convinced me to order a Mini Misti to make correcting stamped images easier.  I'll try this again after it is shipped to me.  Wish me luck.

Wednesday, June 8, 2016

Desertscape

I finally forced myself to make a card.  Today is my brother's 80th birthday and I thought I owed him a card.  This is another watercolor card and the desert is because he lives in the desert.

Monday, May 9, 2016

Hang in there!

I've been making progress on health problems and enjoying spring weather in the desert.  I finally got back into my craft room to make a card.  This is for a friend who's on chemo.
This House Mouse image was colored with Twinking H2Os on water color paper.  The background was made with Distress Inks.  The shimmer doesn't show in this photo, so I used a flash to show the shimmer.

Saturday, April 2, 2016

Evolving cardmaking styles

The style of my cardmaking has evolved over the years.  As a beginner, I was making cards for specific people and considering each person's interests in the design.  Then, I began following trends and copying the styles of other cardmakers.  When I began making cards to send to strangers through Operation Write Home, I tried to guess what recipients may enjoy.  Now that OWH has ceased the mission, I'm getting back to creating cards for specific recipients.

I have a male family member who is very concerned with motorcycle safety.  He objects to black bikes with the bikers wearing all black clothing.  This makes them harder to see by drivers and can create opportunities for accidents.  Here is the card I made for his birthday.
I gold embossed the image from Stamper's Best onto the glossy blue cardstock oval.  Orange frames are also die cut from glossy orange cardstock.  The green stripes are to represent green areas along highways.  The sentiment is a glossy gold sticker.

Next, I had a female relative with an upcoming birthday.  She loves her flower garden.  I made her card with the watercolor lifting technique and iris rubber stamps from Stamp-A-Mania.  The sentiment stamp is by Hero Arts.
Photo - no flash

Photo with flash
envelope

Thursday, March 17, 2016

Watercolor birthday

I managed to finish one more birthday card with watercolor lifting technique.  I used Distress inks and an old Penny Black floral stamp.  The sentiment is a rubber stamp from Stamp-a-Mania.
This card could be used for other occasions, but I put a birthday message on the inside.

Tuesday, March 8, 2016

More birthday cards

I had a little interruption in card making with a storm that knocked out our power for 16 hours.  Fortunately, most of the time was at night and I could stay warm in the bed.  The harder part was that I could have nothing warm to eat.  When the power returned, I really enjoyed a hot cup of tea.

I have now made 2 more family birthday cards, but have a few more to go.


The butterfly card was made like the last post, with watercolor lifting.  The Snoopy card was made by brayering ink into embossing folder to transfer color.  I used a die to cut hole in top layer to expose stamped Snoopy under it.  The pinked circle was a die with same circle die for inside.

Saturday, February 27, 2016

Watercolor lifting

It's been a long winter for me, but springtime weather is making me feel better.  I can't make the cards as in the past because of arthritic hands, but I'm trying.  I saw this technique of watercolor lifting on Jennifer McGuire's blog.  It took me several tries, but here's the card I finished.

Inside of card
I made the butterfly with foil candy wrap (Hershey's dark chocolate kisses) that I bought last fall.  I saved some of the wraps because they were so pretty.  I ran a piece of purple cardstock through my old Xyron and used that adhesive to adhere the foil.  I then cut it out with a Spellbinders butterfly die.  I used Distress ink pads to create the background.  You can go to Jennifer's blog to see the video on the technique.

I hope to try this technique a little more because I have several family birthdays coming up.

Friday, January 29, 2016

Tired of winter

Winters are a difficult time for me.  I don't like the long, dark nights and the cold weather makes my joints hurt.  The arthritis in my hands makes card making difficult in cold weather.  I am happy to say that the days are getting longer and we are starting to see more sunshine.  Last weekend, there was a balloon festival in my home town.  To my surprise, the wind was right to bring the balloons into my part of town.  As you can see from the photos, it was a cloudy day without our normal blue sky.  Even the birds were cold and huddled on the street lights.

One balloon even dropped below the palm trees.  They were pretty, but would have looked prettier with blue sky behind them.
 
I managed to make my first card in a month and it helps me to get focused on all those supplies that are taking a lot of room in my small home.
I mostly used the stitched rectangle dies from Simon Says Stamp.  The sentiment is a very old stamp from Penny Black (2004).