Wednesday, January 12, 2011

Unused & unloved

I have so many things that I have bought in the past on an impulse - perhaps it was on sale.  I'm trying to dig through some of that 'stuff' and try to get it used.  This container is crammed full of this heavy-weight textured cardstock.

These are all in 4 3/4" X 6 1/2" pieces.  Would you believe, I also have a container of 12" X 12" pieces?  I must have really liked this stuff when I bought it!  I've never used any of it until this week.  I'm sure you'll be seeing quite a bit of it used on cards, until I tire of it.  It's heavy and very textured.  This makes it more difficult to adhere to a card.  I use a lot of ATG tape and have been using Miracle Tape on some of it.

OWH Challenge

Today's challenge on the Stars & Stamps blog is to make cards for Operation Write Home, using unused, unloved supplies.  I recently found a whole stack of this heavy-weight textured cardstock.  There are lots of fun colors, but I never found a use for it.  My challenge this week has been finding ways to use this stuff.  Here's what I did with this brown, that looks somewhat like leather:


I also used this roll of Offray Wildcat Camel ribbon.  It seems to go well with this textured cardstock.  I made sure to mount these on a light colored base card, so that it's easier to write a message inside.

There's been requests for more masculine cards and I think these work.

If you would like to see what this paper looks like, check here.

Tuesday, January 11, 2011

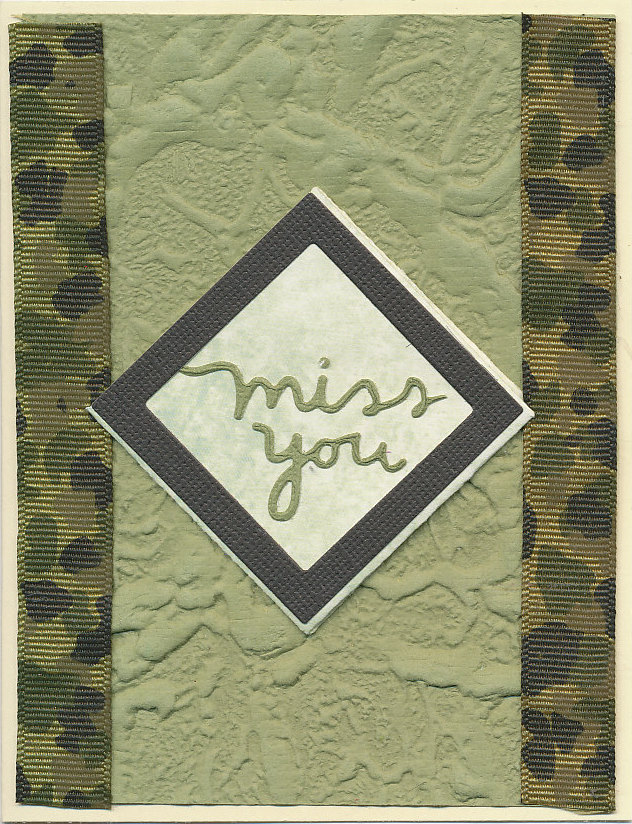
Masculine Miss You card

I made this with the diamond fold technique.  Green textured cardstock is from my stash.  The ribbon is Offray Camoplage GG Olive that I bought at Wal-Mart.  It covered the gaps between the pieces of the face card and makes it look more masculine.  I cut the square black frame with 2 square Nestibilities held in place with magnetic sheet.  The Miss You die is Love Languaage set from Cuttlebug.  This is all mounted on a cream base card.

Monday, January 10, 2011

More small diamond folds


I'm still playing with this technique with the diamond folds.  These were folded from 3" X 9" pieces of designer paper.  The face card is cut in half and mounted on each end flap.  These are then glued to a base card and metallic stickers are added for decoration.

Sunday, January 9, 2011

Smaller diamond fold

I'm still playing with the diamond fold.  This time, I started with a 3" X 10" piece of paper.  The instructions worked fine until got to the part where I create the vertical folds.  I just had to fold them so that the folds were where they should be.  I'll have to measure the next one.  Edit: Cut 3" X 9".


I cut a base card (5.5" X 8.5") and a face card (4.25" X 5.5") from the same green cardstock.  I cut the face card in half (2.75" X 4.25") and glued each piece to the end flaps, so the meet in the middle when they diamond folded paper is folded flat.

Next, I glued the end flaps (with face card) to the base card, one at a time.

I then trimmed the edges, so that the face card and base cards were lined up.  I stamped Happy Birthday onto a small square of the paper I used for the diamond fold.  I also cut a square of the darker textured cardstock to frame the sentiment and glued them in place.  I added some Class A'Peels stickers to cover the gaps in face card and as decorative elements.


Vertical Diamond Fold card

I made this card the same as the previous one, but made it a vertical card.  When I attached the top 2 pieces of blue Bazzill Bling to each side of the diamond folded portion, it left a slight gap, showing the white base card.  I used a silver Class A'Peels border sticker to cover the gap.

Saturday, January 8, 2011

OWH Diamond Fold

The Stars & Stamps blog had a tutorial on making a Diamond Fold Card.  The challenge I found was to create a place on this card to write a message.  Here is my solution:
front view
back view


After folding the diamond fold from 4" X 12" paper, I cut a piece of cardstock 4 1/4" X 5 1/2", cut in half vertically.  I glued each 2 3/4"  X 5 1/2" cardstock to end pieces of diamond folded paper.

 Next, I cut a base card from white cardstock, 5 1/2" X 8 1/2", scored in middle.  I adhered the back side of the end flap from the diamond folded section to one side of base card.

Next I adhered the other end flap to the other half of front of base card, using ATG gun.


This created a regular card to write a message.  I decorated the front of  card with Class A'Peels corner stickers.  I attached a square of the heavy weight textured cardstock to front of diamond fold, the stamped the Thinking of You onto a square piece of the same paper I used for diamond fold. and glued it to center.

The diamond folded section does not open, but does stand out from the card.

Thank you

I'm still playing with my stash of paper.  This heavy weight textured cardstock is a challenge to hold with adhesive.  I'm using the ATG gun, with lots of strips of adhesive.  I love the Lattice Chain punch from EK Success.  I'm looking at some new chain punches.  They are making some fun ones.  The base card on this is Bazzill Bling.  It's quite shiny in real life, but doesn't show that in the scan.

Friday, January 7, 2011

Playing with design

I'm working on using up my enormous stack of stash.  I've had these papers for some time and I'm trying to come up with creative methods of using them.  The base card is ready made by DCWV.

Thursday, January 6, 2011

Thinking of You

While digging through my paper stash, I found a whole stack of this heavy weight textured paper in some yummy colors.  I'll be using more of it.  I don't know why I never used it after I bought it.

This a another premade card base from DCWV.  The 1" strip looks like ribbon in the scan, but is really from a sheet of paper by Provo Craft.  I like this stamp by Verses and it works well for Operation Write Home.