Sunday, June 5, 2022

Pop up butterfly cards

 I've been working on a few cards, but haven't been good about posting then.  Once again I was inspired by Jennifer McGuire.  Check out her blog here to learn how it was done.  I didn't attempt to take photos, but used what I had available.  I used some background dies for the backgrounds, then stamped and die cut the butterflies.  The wings pop up when card is removed from envelope. with the help of some acrylic hinges.


With all the depressing news on TV, I made a card for my neighbor to help us both get through this sad time.  I used a variety of dies and a background made with alcohol inks.


Wednesday, May 18, 2022

One more try

 I made another attempt to use this kit from the last 2 posts.  This time, I stamped the floral image, then colored it using the stencils with blending brushes and ink pads.  After this, I used the die to cut out the image.  Next, I used embossing folder to give some texture.  Finally, I glued the die cut image to 5" x7" card base, wrapping the excess around to back of card.  This is a lovely set, I just wish it was a bit smaller to fit the cards most people make.


Wednesday, May 4, 2022

Keep trying

 Since I tried the new to me technique, explained in my last post Here, I tried to figure out a way to use these new supplies.  One of my problems was checking placement of cardstock in embossing folder.  I aligned the stamp with the embossing folder, then placed them in my Misti stamp positioner and closed the Misti door on the stamp.  I remove embossing folder and stamped image on cardstock.  I then colored the image with my stencils and cut out the colored image with die.  Finally, I placed die cut image in embossing folder and ran it through my Big Shot.  I layered it on another die cut image and adhered it to a 5 1/2" X 7" card base, then die cut a sentiment and added this to card front.  I had to cut off part of the leaf on lower left to fit the card.


Thursday, April 28, 2022

Trying new things

 Since I keep getting older and less able to color images, I've been trying new ways to make cards.  I watched Jennifer McGuire show how to color embossed images with stencils.  You should watch this to see why I was inspired to try it.  Obviously, I'm not as talented as Jennifer.  I tried to buy the set she used but it was sold out.  Instead, I bought another similar kit from Altenew.  I bought the Feathered Lilies Kit.

When the kit arrived, I was surprised that the stamped image was huge.  It's far too big for the cards I make and the sentiments were so small that my old eyes couldn't read them.  I decided to give it a try.  I stamped the floral image on some cardstock and embossed it.  My old eyes and hands didn't get them lined up perfectly.  I also tried embossing another piece of cardstock with the embossing folder.  I used the stencils and colored the embossed images.  I made such a mess that I had to cut off the most damaged areas before mounting them on cards.  The 1st card is 4 1/4 X 5 1/2 and the 2nd is 5 X 7.


x


Sunday, April 24, 2022

One more Birthday card


This card was made for a male relative.  The background is embossed with a Simon Says Stamp embossing folder on metallic cardstock from Tim Holtz, then sanded to expose the kraft cardstock backing.  The bird and sentiment are cut with dies. 

Thursday, March 24, 2022

Another birthday card

I managed one more birthday card for the month.  This one is for my adult grandson. I used an alcohol ink background from my stash.  Hint: When you are making a mess with alcohol inks, make extras backgrounds for your stash. 

I used a new (to me) Spellbinders die for the frame and a sentiment die from Poppy Stamps.


I also made another card for a female relative who recently had surgery.  I used dies from Poppy Stamps for both the pinpoint background die and the sentiment.  I added a die cut butterfly and a hand cut frame from for the same glossy gold cardstock that I used for the sentiment. The card base is a very old mulberry cardstock.


Monday, March 21, 2022

Birthday cards

 I've managed to make 2 more birthday cards.  Actually, one was made 2 years ago.  I added the sentiment to make it a birthday card.  Here is the original card.  


The other card I made is for my adult granddaughter, so I made the sentiment and frame with a die and glitter paper.  The background is made with a die that cuts open areas in the cardstock.  I backed it with a background from my stash that was made with Twinkling H2Os.


Sunday, March 6, 2022

Cards for men

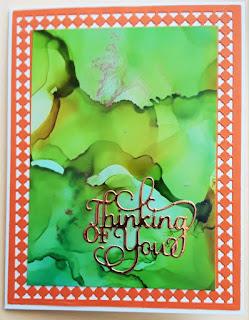
 I have been struggling to create cards and have wasted a lot of paper, but finally made a couple of cards to mail to male family members.  The first is a simple thinking of you card, using an alcohol ink background from my stash.

The second card was made with an embossing folder with inked highlights. I wasted a lot of paper before settling for this birthday card.


Sunday, February 27, 2022

Birthday month

 There are a lot of family birthdays in March, so I have to get started making cards.  This first one is made with pearlescent paper and dies. The background is made with the Detail Ringlet Plate from Simon Says Stamp.  It produces pinpoint holes in the background.


You can see the pinpoint design and shimmer in this photo.


Friday, February 25, 2022

Getting started again

This has been a slow start in making cards this year.  I'm trying to use some new supplies, mostly dies.  The backgrounds are mostly from my stash of alcohol ink playing.


I made this last card with an embossing folder and some dies.

Friday, December 31, 2021

Tuesday, December 7, 2021

Peace on earth

In this year of turmoil, my wish now is to have peace, so this is how I created Christmas cards this year.  I bought an angel die from Simon Says Stamp and a Peace die from Impression Obscession.  I tried a variety of cardstock to cut the angel and sentiment and mounted them on an embossed background.


I used glitter cardstock, silver cardstock and holographic cardstock.  On the last one, I rubbed gold ink on the embossed background.  I mounted the design on a white base card and stamped a simple message inside.


Tuesday, November 30, 2021

100 Birthday Wishes

My brother will soon celebrate his birthday at 100.  I would love to be with him, but neither of us are able to travel.  I made a card for his big day.

The elements are all made with dies. The 12-point stars are cut from glossy paper with Hero Arts Infinity dies. The sentiment die is by Tonic.  The number dies are very old ones from Sizzix and cut from glitter paper.  I added some acrylic stars to the sentiment.

Sunday, November 7, 2021

Thanksgiving cards

To save time this year, I made my Thanksgiving cards the same design.  The Maple Leaf Corner die is by Simon Says Stamp.  The leaves pop out, so they can be made in different colors.


I made a stack of them in similar colors.  One of my frustrations was keeping the outline die from distorting when gluing it down.  This makes the leaves not quite fit in the rest of the die.  I found that it worked better to add an adhesive sheet to back of cardstock before cutting.  When I added liquid glue to back of diecut, it got distorted.


I stamped this sentiment inside all the cards.


Thursday, October 28, 2021

Birthday card, finally

 I wanted to create a special birthday card for a special friend.  This is the finished card.


I could stop here, but wanted to show you the frustrating process of creating it.  I started with this set of stamps from Altenew.


This involves stamping several layers on top of each other with different ink colors.  I'm not good at getting them lined up and had quite a few problems.  After stamping the flower, I cut a mask with the die that came with stamp set.  The mask had a space around the image, so that when I added the leaves, there was a space.  Here are some of my problems:


I tried to fill in the gaps in image with a stump dipped on ink pad. This helped a bit, but not completely.  I also had problems getting ink smudges on the cardstock.  I tried the sand eraser for lightening smudges and covered others with an old whiteout pen.


I finally added my image to the card base with a die cut frame and sentiment.

My next frustration came when I stamped a message inside the card.  The ink smeared, so I stamped it on another piece of cardstock and added a frame around it to cover the smeared mess.

After thinking I was finished, I discovered a spot on upper part of front of card.


We all make mistakes in cardmaking, but the recipient only sees the finished product.