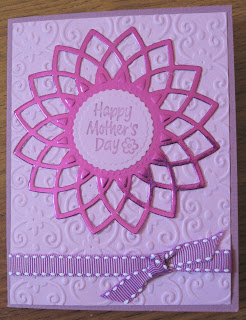
These cards are the same as yesterdays, but I added some texture. I put the background through the Big Shot with Cuttlebug embossing folders - swirls & dots. I also lowered the knots in the ribbon to bring the focal point closer together. Do you think the helped?
Thursday, March 31, 2011
Texture added to dimension
These cards are the same as yesterdays, but I added some texture. I put the background through the Big Shot with Cuttlebug embossing folders - swirls & dots. I also lowered the knots in the ribbon to bring the focal point closer together. Do you think the helped?
Wednesday, March 30, 2011
Texture & Dimension

This is my attempt to add some dimension to my cards. I made this after watching the Saturday Seminar #2, presented on March 26, 2011. You can read about it on the blog and watch the video on the Stars & Stamps blog.
I'm not sure I did much to add texture, but the ribbon is grosgrain and has a little texture and the scallops give that allusion. I used dimensional foam mounting tape to raise the image and the sentiment a bit. I placed the knot to even out the raised areas. The layers help to separate the elements. I'll work on this idea some more, but this is my first attempt.
This is a photo taken from the edge to help show the dimension.
This is a photo taken from the edge to help show the dimension.
Saturday, March 26, 2011
My report on the OWH Design Seminar #2
The highlights of the Design Seminar this morning are posted HERE. I watched it live on UStream and learned a lot. You can watch the video of this show HERE. It is called Seminar 2: Texture & Dimension.
The purpose of this seminar is to improve our card making designs, so that we can send better quality cards to our deployed troops to send to their families. We should all be proud of the cards we make and do the things that we enjoy and do best.
I have learned that we all have differents talents and skills. If we don't do something well, choose another technique. I don't do a good job of coloring images and shading, so I rarely do that type of card. Digis just aren't for me, but others love them.
I can't seem to combine patterned papers to make a good finished card. For this reason, I don't use them often. I prefer to make my own backgrounds. I also have problems with card sketches because most people use patterned paper for some of the elements. I'm trying to learn, but I'm often not pleased with the result.
My goal is to keep learning so I can really be proud of the cards that I make.
Mom's Butterfly card
 I'm eagerly awaiting the Design Seminar which begins in less than an hour on UStream. While I'm waiting to learn more about Texture & Dimension, I've been practicing. I'm curious to see if my ideas are correct.
This is a premade card base by DCWV. I had difficulty finding paper and ribbon that didn't clash. Who knew there were so many shades of brown.
I chose to stamp (Stampendous) on Valley Forge Parchment Paper - Olde Natural with Memento Rich Cocoa ink. The Sentiment is computer generated and it's hard to get the right color with the printer.
The base card has blue dots in the center of each 'puff', so I chose blue as an accent color. The butterfly is punched from pearlescent paper, with an oval pearl from Martha Stewart. The punch is also by Martha Stewart. I did pop the sentiment on some dimensional foam tape and the butterfly is only glued in the center, with the wings raised.
Friday, March 25, 2011
Design Seminar #2 - tomorrow
Tomorrow is Design Seminar #2 presented by Operation Write Home. This will be shown on U-Stream, beginning at 11 AM (PDT) - adjust for your time zone.
These Design Seminars are to help us create nicer looking cards. I learned a lot from Seminar #1 - Focal Point and I'm looking forward to #2.
If you've never watch OWHtv, you're in for a treat. A new show is created every Thursday evening at 6:30 PM (PDT). These shows have been recorded and you can watch the videos on this same channel. I like to watch them live when possible. Sandy stays on for a chat after the show. It's nice to be able to chat and ask questions.
See you tomorrow!
Seminar 2, March 26, 2011: Texture and Dimension
Taught by Sandy
Class assignment practice: March 26-April 9
Class assignment submissions: April 9-April 16
Class critique and gallery launch: April 23
Taught by Sandy
Class assignment practice: March 26-April 9
Class assignment submissions: April 9-April 16
Class critique and gallery launch: April 23
These Design Seminars are to help us create nicer looking cards. I learned a lot from Seminar #1 - Focal Point and I'm looking forward to #2.
If you've never watch OWHtv, you're in for a treat. A new show is created every Thursday evening at 6:30 PM (PDT). These shows have been recorded and you can watch the videos on this same channel. I like to watch them live when possible. Sandy stays on for a chat after the show. It's nice to be able to chat and ask questions.
See you tomorrow!
Wednesday, March 23, 2011
My Doxie & Cards 4 Kids

After the previous post, I'm spent some time thinking about my dog, Tex. I found a picture of me holding him when he first arrived by airplane from Texas. He was 4 months old. He sure was a cutie and we bonded immediately. In the 5+ years since then, I have lost a lot of weight and he has gained a lot. The second photo is Tex feeding Peter Rabbit. He feeds all his 'pets'.
Now, back to what I started out doing. I'm making cards for our deployed troops to send home to their kids. I made a couple of these today.
OWH MWT - Cards 4 Kids
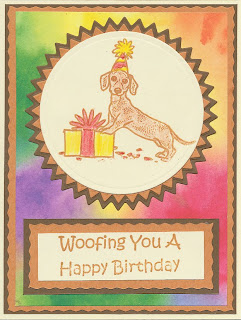
I made this card for the Operation Write Home Midweek Throwdown - Cards 4 Kids. I'm trying to make kids cards more colorful, which is not my usual style.
I bought a group of these dachshund stamps from Cowtown when we got out dachshund puppy 5 1/2 years ago. I haven't used them lately, so I decided to pull them out today. I used Nestibilities to cut the circles and my rotary pinking blade to cut the straight pinked lines. The pinking is different in them, but the idea is there.
I'm learning to do more layering to frame my images and messages. Do you think this helps to bring continuity to the cards?
This is my dog, Tex. He's gained more weight since he was a cute little puppy, but we love him. He's my faithful company. He knows how important food is to him, so he even feeds his stuffed animals. They get dipped in his food bowl and shaken, then he throws them out so he can eat.
Monday, March 21, 2011
More cards
Today was spent duplicating the cards I made on Saturday. It's easier to make cards once I have a design in mind. I had to change some of the colors because I didn't have enough cardstock of the original colors. These will all go to Operation Write Home and will be sent to our deployed troops to send home to their family and friends.
Sunday, March 20, 2011
Craft Storage - tutorial
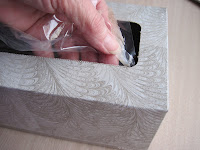
 This morning, I emptied a Kleenex box. I use these for storage in my craft room. While going through the process, I took photos so you could see how I did it.
I insert my thumb between the clear plastic around the opening and the cardboard, pulling the plastic membrane out of the box & discard it.
Next, I cut the top at the corners with a sturdy pair of scissor.
I apply a strong glue (I use Crafter's Pick Ultimate glue) under all the top flaps and push them to inside of box. Sometimes the sides of box separate, so put some glue under that flap also. Hold the glued flaps in place with clothes pins until the glue dries and cures.
I use these converted Kleenex boxes to store a lot of different supplies in my craft room. They are great for organizing bottles, rolls of tape or ribbon, scrap piece of cardstock, embellishments, etc. They also fit nicely on the shelves of a bookcase. You can label them, but I don't because I can see what's in them.
Saturday, March 19, 2011
OWH Virtual Cardmaking Party
Operation Write Home is sponsoring a Virtual Card making party on Facebook today. There have been challenges every 2 hours. I haven't done all of them, but these are the ones I've completed.
The first card I made today was this Vest Card. There is a video tutorial on U-Stream to show you how to make this vest. I'm not really pleased with this one, but will try some more later.
 The next card I made was to use the Sights & Sounds of Summer to create a card. Since I live in the desert, I think of the sun in the summer. The troops serving in the Middle East also see a lot of sun in summer, so I thought they might enjoy sending this card home.
I cut out the sun with a Sizzix Original die - Blazing Sun. I used a hot yellow for the sun and distressed the flares with Memento Potter's Clay ink. I cut a couple of circles with Nestibility circles to highlight the sun.
I stamped the sentiments with Hero Arts stamps with Memento Potter's Clay ink & added layering with the same paper I used around the sun.
 The third card I made was a challenge to make a card using embossing, either heat embossing or dry embossing.
The first card I made today was this Vest Card. There is a video tutorial on U-Stream to show you how to make this vest. I'm not really pleased with this one, but will try some more later.
 The next card I made was to use the Sights & Sounds of Summer to create a card. Since I live in the desert, I think of the sun in the summer. The troops serving in the Middle East also see a lot of sun in summer, so I thought they might enjoy sending this card home.
I cut out the sun with a Sizzix Original die - Blazing Sun. I used a hot yellow for the sun and distressed the flares with Memento Potter's Clay ink. I cut a couple of circles with Nestibility circles to highlight the sun.
I stamped the sentiments with Hero Arts stamps with Memento Potter's Clay ink & added layering with the same paper I used around the sun.
 The third card I made was a challenge to make a card using embossing, either heat embossing or dry embossing.
I chose to use this Cuttlebug Argyle embossing folder. I used a technique I learned on Stamp TV to add ink to the folder before embossing. I used cream cardstock and Memento Rich Cocoa ink.
I stamped the Art Impressions golfer and the Hero Arts sentiment with the same ink on cream cardstock. I cut out the golfer with a long rectangle Nestibility, using another technique I learned from Stamp TV. I cut out the head of the golf club before cutting with the Nestibility, so it stuck out past the edge.
I used the dark brown cardstock to cut frames for all the elements on the card. I chose not to color the image to maintain the monochromatic look.
I chose to skip the 5 PM challenge because it was to make a card with a cute digi. I'm not a fan of these types of digis, so I didn't participate.
For the final challenge of the day, I made a 'love' card with a stamped image. This is an old Posh Impressions stamp. I colored the stamp with Marvy Brush Art markers before stamping. I cut all elements out with Nestibilities rectangles. The ribbon is very sheer and sparkly, so I glued a piece of lavender cardstock under it to glue it to the card base.
For the final challenge of the day, I made a 'love' card with a stamped image. This is an old Posh Impressions stamp. I colored the stamp with Marvy Brush Art markers before stamping. I cut all elements out with Nestibilities rectangles. The ribbon is very sheer and sparkly, so I glued a piece of lavender cardstock under it to glue it to the card base.
Now, it's time for this oldstamper to go to the recliner with a cup of Sweet Dreams tea. The old body can't keep up with these youngsters.
Friday, March 18, 2011
Birthday cupcake & balloons
This a colorful card for my grandson's birthday. Candle border punch is by EK Success. Cupcake stamp is unlabeled & colored with Prismacolor Pencils. Paper from my stash.
OWH Seminar 2 - Texture & Dimension

I learned a lot from Seminar 1 on Focal Point.
I'm really looking forward to Seminar 2.
Stay tuned for more information as it becomes available.
Let's all work to improve our cardmaking skills.
Seminar 2, March 26, 2011:
Texture and Dimension
Taught by Sandy
Class assignment practice: March 26-April 9
Class assignment submissions: April 9-April 16
Class critique and gallery launch: April 23
Thursday, March 17, 2011
Birthday Correspondence Cards
These cards are fun and easy to make, but hard to photograph.
You can see the tutorial on the Stars & Stamps blog.
Wednesday, March 16, 2011
Scallops Birthday card
I made this card for the Scallops Challenge at the Stars & Stamps blog. It's looks like I'm still thinking polka dots, but it's just a coincidence. This is a ready made card base from DCWV. It just happened to work with my scallops. The stamp is one I just bought from Stampendous. The sentiment stamp is by Hero Arts. I added the ribbon to tie the elements together.
Tuesday, March 15, 2011
Spring has arrived
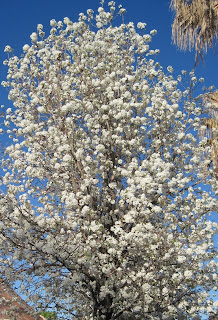
I know that it is really spring here in the southern Nevada desert when the trees bloom. This is a crabapple tree in my neighbor's yard. Lots of trees are blooming in our area. I enjoy this tree because I see it everyday. The flowers are so pretty and the bees are active. I just can't capture a good close-up photo of the bees.
I also have flowers in my home. These are supposedly Christmas Cactus plants, but they are beautiful right now.
Metamorphysis
I took these photos many years ago. I recently scanned the negatives and worked with them in Picasa. At the time I originally took these photos, I experimented with raising butterflies.
 |
| Metamorphysis Black Swallowtail Butterfly |
I picked some of the parsley and put it in a jar to watch the progress. It is necessary to have have lots of available parsley for this. Those little guys eat a lot and grow fast, so I had to keep added more parsley to their jar. I learned a lot about butterflies in the several years that I did this. If you want to try this, it's very educational.
At the time, I created photo collages in my home darkroom. I matted and framed them and sold a few. I never kept one for myself. Now, I'm trying to recreate this on my computer. Fun project!
Sunday, March 13, 2011
Photo vs. Scan
I made a few more Mother's Day cards for Operation Write Home. I've tried getting good images to show the colors, but neither the photos or scans really represent the actual colors. The really look like good combos.
 |
| Scan |
 |
| Scan |
The top cards have the Pendant cut from a very glossy paper. It actually changes color with the amount of light hitting it. It's very pretty, but hard to match with anything. The scanner just won't pick up that shine.
Saturday, March 12, 2011
Mother's Day card
I was watching the OWH TV show on U-Stream on Thursday evening. You can see the videos of the show HERE. You can also watch the show live every Thursday evening at 6:30 PM (PST) at the same link. On this show, it was mentioned that lots of Mother's Day cards are needed and the deadline is March 31. I decided to make up some more for the box going in the mail on Monday.
This is similar to others I've been making, but I reversed the colors. It turns out that I had no ribbon that looked good on this card & I needed something for the lower part of the card. I cut a 1" wide strip of cardstock and used a Martha Stewart border punch to punch along both sides. You'll have to measure each punch to see how wide it needs to be for that punch. I also put a sheer pink ribbon over the top for softness.
Now, I need to make a few more of these.
Friday, March 11, 2011
Birthday Pendant
This is very similar to yesterday's card. I used new embossing folder by Sizzix - Flower Vine. I just just a bit off the edges, so the base card would show, making a frame for the pink. The Lotus Pendant and the Happy Birthday circle are by Spellbinders. Stamp by Hero Arts and ribbon from my stash.
Subscribe to:
Comments (Atom)


