Monday, February 28, 2011

Practice, practice, practice

I'm spending lots of time practicing coloring bunnies after the video lesson.  If you want to join me, here's where you can learn more.  Sandy Allnock taught us how to color these digis. 


I printed a lot of them, like she did, and have been practicing my shading techniques.  I also printed her samples and have the cards I've finished handy for comparison.


Bunnies come in a variety of colors, so I'm trying different combinations.  Soon, I will make up some cards with these smaller bunnies.  The larger ones took up most of the cards. 

I'm using Prismacolor pencils and odorless mineral spirits.  I keep my electric eraser handy.  It's probably one of the best purchases I have ever made.  It's battery operated and you can refill the tips.  I got mine at the craft store with a 50% off coupon.  I use it for both pencils and chalks.

Sunday, February 27, 2011

Bunny cards


These are the bunnies I colored in the earlier post.  I made them into cards.  Sentiment is computer generated in Word Art.  See coloring post here.

I just remembered that the gray bunny wasn't posted earlier.  I did color it using the technique that I learned in yesterday's lesson on UStream.  Here's more info on that lesson.

Edit:  After I finished posting this, I realized I forgot to draw in the whiskers.  Do you like these better?

Learning to color images


Yesterday, I took a video class on UStream to learn shading techniques when coloring images.  This digi was our sample.  You can watch the video and play along on this blog:  A Colourful World.  The digi is free and can be obtained here: A Colourful World.  Sandy also shows how to color with Copic markers, if you use them.

My samples are made with Prismacolor pencils and Odorless Mineral Spirits.  I colored the bunny on the left during the session and colored the bunny on the right this morning.  I have a lot to learn and welcome suggestions.

I rarely color images for my cards because I find them so difficult.  I'm hoping these classes will make it easier for me to do this in the future. 

Saturday, February 26, 2011

Rain, Rain & More Rain!


It's raining again in my neighborhood.

Fortunately, the snow is staying in the mountains!

Thursday, February 24, 2011

Thinking of you

This card was made with the Faux Pressed Flower Technique.  The flowers are silk taken from a stem.

Wednesday, February 23, 2011

MWT - Any Occasion cards

Today's challenge for the Midweek Throwdown on the Stars & Stamps blog is to make a card for our deployed heroes to send home to family and friends with an all occasion theme.  General cards that aren't for a special occasion are easier for them to use.
I made this card using the embossed flower technique from the previous post.  I stamped the flourishes and sentiments on the green cardstock, then glued the flowers and butterfly onto the cardstock before embossing.  Some of these flowers are silk flowers that have been removed from the stems and others are punched.  I added the adhesive backed half pearls after they were embossed.

Embossed flower card

I made this card for a challenge on the Stars & Stamps blog.  The flourishes were stamped with a clear stamp and Memento tuxedo black ink.  I then stamped the sentiment with clear stamps and the same ink.  The Prima flowers were put through my Xyron 150 to add adhesive.  Some of them are cut in half or thirds, then adhered to the stamped image.  Next, I ran the card through my Big Shot with a Craft Concepts Garden Swirl embossing folder.  Trimmed, layered and placed on the base card.

Tuesday, February 22, 2011

Desert Skies


Sunset

Sunrise

I wanted to show you what blue skies we have in the desert.  Both these photos were taken from my front yard.  The sunset photo was taken last night.  You can see that the sun is setting to the right of the photo and still shows a few remaining clouds.

The sunrise photo was taken this morning.  The sun is coming up on the left of the photo and the clouds have disappeared.  Isn't that blue sky gorgeous!  I know the clouds and rain will return, but for now everything is wonderful.

I have been working on a few cards, but can't show them to you yet.  I'm working on a tutorial for the Operation Write Home Bunny Hop, coming on March 5.  Stay tuned for a lot of exciting Spring and Easter cards.

Sunday, February 20, 2011

The Desert Monsoon


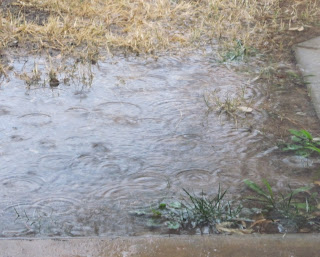
This is the view of my patio this morning.  When it rains in the desert, it pours!  The first photo is my window, looking toward my back yard.  The second photo is the puddle that is growing next to my patio.  To take liberty with the lyrics of another song - Rainy days on Sunday get me down.  Actually, rainy days anytime get me down.

We've had 1.2 inches of rain yesterday and today, so far.  This may not seem like a lot to some of you, but we normally only get 6 inches of rain a year here in the desert.  After all the rain we had in December, we are already well ahead of our normal rainfall.  I'm sure it is snowing in the nearby mountains, but they are hidden in the clouds.

It's hard to feel creative when I feel so terrible.  All this humidity really makes my joints ache.  Hopefully, we'll soon see our gorgeous blue sky again soon.

Afternoon:  The rains stopped for now and the mountains became visible.  Snow level is much lower than it was yesterday.  Nice view from my front yard.


Saturday, February 19, 2011

Snowy mountains

 
It's monsoon season in the desert again.  We get our rain in July & August and again in February.  It rained quite a bit during the night and this morning here in the valley.   The nearby mountains got some snow.  It sure is pretty when you don't have to shovel it!  I took this photo from my front yard.


Thursday, February 17, 2011

Another Masculine Camero

I printed the digi Camero from Stamper's Best on cream colored cardstock.  I decided to print them in a smaller size.  I cut them out with petite oval Nesties and cut a frame in the dark brown in the next size.  The rest of the card is very monochromatic, but I think that makes it more masculine.  Do you agree?

I thought about making these Father's Day cards, but wanted them more generic.  They could still be used for Father's Day, but are also suitable for other occasions. 

Now, I need to make a bunch more of these.  Operation Write Home can divide the multiples to go to different units.

Wednesday, February 16, 2011

OWH Masculine Midweek Throwdown

 
I made this card for the Masculine Midweek Throwdown on the Stars & Stamps blog.  This car is a digi from Stamper's Best.   I cut it out with a Nestibility petite oval, along with a black frame.  The brown strip is heavy weight textured paper and the ribbon is by Offray.

I printed this digi a bit larger and cut it out with a rectangle and rounded the corners.

Tuesday, February 15, 2011

Old becomes New again, with time

Once again, I'm reverting to old techniques.  Old is new again to those who haven't tried it before.  In this technique, I pulled out my old metal stencils that I used with a light box and stylus years ago.  This is how we embossed before embossing folders were invented.

I ran the metal stencil through the Big Shot with the silicone rubber and impressions mat.  These direction are printed on Tab 1 of the Multipurpose Platform.   I cut out the embossed cardstock & rounded the corners to remove the lines from edge of stencil.

I used the stencil to add chalk to the raised areas.  I also added chalk to the edges to soften the look.  I then sprayed the chalked cardstock with fixative so it won't rub off.  Next, I rolled the edge on Versamark ink, dipped it in gold embossing powder and heated it with heat gun.  I cut the purple frame using the same method - trimmer & corner rounder punch.  I stamped the sentiment onto the base card with Palette Iris ink pad.  Finally, I adhered the framed layer to cream base card.

Now, I have a whole bunch of metal stencils to try out.  These have been taking up storage space for years.

Sunday, February 13, 2011

More Faux Pressed Flowers


I've been playing with this technique from Splitcoast Stamper.  I started by running the silk flowers through my Xyron 150, then stamping stems and leaves with a Hero Arts flower stamp.  I adhered the silk flowers above the stems.  I also stamped the sentiment onto the cardstock.  The top card  had the punched butterfly glued on before embossing and it was added later to the second card.  I also used 2 different embossing folders.  The gems in the center of flowers are from Recollections.

This card is done the same way, in a different format.  I can see this technique as being very versatile and I'll probably do more of it.

Saturday, February 12, 2011

Faux Pressed Flowers


This is a fun technique from Splitcoast Stampers Tutorial.    On this card, I stamped the stems only from a Hero Arts flower stamp 3 times onto a piece of white cardstock.  The red flowers are silk flowers plucked from a stem from Wal-Mart.  I ran the flowers through the Xyron 150 to put adhesive on the backs.  I just pressed the flowers on at the top of stems.
I ran the cardstock (with flowers & stems) through the Big Shot in the SU embossing folder.  I trimmed the embossed piece and added a red layer as a frame, then mounted it on a white base card.  I stamped the Hero Arts sentiment on white cardstock and adhered it in the corner.  I decided it needed more so I put some adhesive backed gold half pearls in the center of each flower.


Cut 'N Tuc & Lace Templates for sale-SOLD


There was recently a tutorial on the Stars & Stamps blog about using these templates.  I paid over $40 for them and my hands just can't cut with the craft knife.  I'd love to get them in the hands of someone who can use them.  Contact me if you are interested - oldstamper@gmail.com.  For $10, including shipping by Priority Mail, all of these things can be yours.
These have been sold.

Valentine


I'm always making personal cards at the last minute.  My hubby is sleeping in this morning, so he won't see this until Valentine's Day on Monday.  He doesn't read my blog, so it's safe here.

This is a new technique for me.  I read about this technique on Splitcoast Stampers.  It is called Faux Pressed Flowers.  They glued Prima Flowers on the cardstock, then embossed it.  In this card, I used metallic stickers on the cardstock before embossing in an embossing folder.  The stickers are quite shiny, but the scanner doesn't pick this up.  It gives a much different look and the stickers seem well adhered after a pass through the Big Shot.

The punched frame is made with a Martha Stewart set.  I just used a white base card because the rest is so busy.


Thursday, February 10, 2011

Red, white, blue & kraft

I made this card for a challenge on the Stars & Stamps blog.  The challenge was to make a card for Operation Write Home for the troops to send to their friends or families that is made using the colors red, white, blue & kraft colors.

I have spent several days cleaning off my table and separating the scraps of paper into separate containers.  All of the materials for this card came from that stack of paper.  The base card was apparently the other half of a piece that I had cut for another card.  The liner had been cut and run through the Xyron, so I just had to stick it to the inside of card. 

The white cardstock had already been cut and embossed.  I just stamped the Thinking of You in Memories Blue onto a scrap of kraft cardstock & cut a scrap of red to make a frame.  The red with white dots was also precut, as was the vertical blue scrap of cardstock.  This is why I can't through anything away!

Tuesday, February 8, 2011

More birds & flowers


I made this card nearly the same as the last one, but used cream cardstock for the Lattice Chain (EK Success punch). The flowers are from Prima & adhesive backed half pearls are from Recollections. Birds on a Wire punch is by Martha Stewart.
Posted by Picasa

Sunday, February 6, 2011

Birds & Flowers

I'm still working on a design for my Martha Stewart birds punch to make Mother's Day cards.   I made this one a little less busy than these in a previous post.  I used 3 little Prima flowers with a light green half pearl in the center of each. 

Saturday, February 5, 2011

Another Golfer Dad

I really wasn't pleased with the card I posted this morning, so I framed it.  I used my old Sizzlet Classic Alphabet dies and cut the shadow letters from adhesive backed cardstock and made frames for the digi golfer (from Stamper's Best) with the same cardstock.  I think this highlights the image a bit more and makes the letters blend with the frame.

Golfer Dad

I'm working on keeping some open space on my cards, as was suggested in a comment on a previous post.  Instead of putting the larger Happy Father's Day stamp on the card, I simplified it to Dad, without the surrounding rectangle and ribbon.  This golfer is a digi image from Stamper's Best.

It's so easy to get cards so busy that we lose the focus.  This card can be used for any occasion that calls for a card for Dad, not just Father's Day.

Thursday, February 3, 2011

Father's Day Golfer

I made this card with a digi image from Stamper's Best.  I printed the golfers on tan cardstock in black ink, then cut it out with a Nestibility long rectangle die.  The Happy Father's Day is an unmounted, unlabeled stamp that I stamped with black ink on the same tan cardstock.    I also cut out the sentiment with a Nestibility long rectangle. 

The green paper is from a Stamp Pad from Provo Craft.  I just put a dark brown ribbon across the top, then glued this to a dark brown base card.  I thought it needed something on the lower right side, so I punched dots from the scraps of the tan cardstock and glued them in place.  I lined the inside of this card with more of the tan cardstock.

Wednesday, February 2, 2011

Mother's Day birds

I'm still working on the OWH Spring Thaw Challenge and need more spring holiday cards to fill my box before mailing.  I decided it's not too early to make Mother's Day cards. 

I wanted to use the Martha Stewart birds border punch.  On this card, I also used a Spellbinders border die along the bottom of the blue cardstock.  I added the Lattice Chain from a punch by EK Success, the topped it with a white Daisy Chain from another EK Success Punch.  To create a better focal point, I added the 3 flowers from the Brides section at Michaels and put a gem in the center of each.  Next, I stamped the Happy Mother's Day with an unmounted stamp.

I felt that the card was weighted too much on the right side, so I made another card, using a cream colored Daisy Chain and moved the Brides flowers and the sentiment closer to the center.

Which card do you like better?  I think I like the second one and will probably make a few more of those.

This idea started with the this post where I tried to re-work a previously made card, using the Card Design Seminar.  I'm planning to work on this idea more in the future.

Tuesday, February 1, 2011

Easter cards

 Operation Write Home is working on a card drive for spring.  This is called the Spring Thaw Challenge.  We are supposed to make half spring holiday cards and half general cards.  Since I have the majority of my cards for general use, I decided I need to make some holiday cards, so I started with Easter.  I have a few St. Patrick's day cards in the box.

This Bible die is an Ellison Thin Cuts die that I have had a long time.  The cross and the pages are easily removed after cutting and can be replaced with another color.  I made some of the Bibles in black and some are brown, but made all the crosses and pages in shiny metallic gold.  That glossy gold is hard to capture on film and doesn't show at all with the scanner, but is very pretty in real life. 

The lilies are an old unmounted stamp by Jim Stephens.  I stamped it in black, colored with Prismacolor pencils and cut it out.  The frames are cut with Nestibilities Labels 2 and the Happy Easter is computer generated.

I worked on maintaining a strong focal point while designing this card.  I'm still practicing with the Card Design Seminar that was on the Stars & Stamps blog on January 29.